Module 2: Working with BIG-IP HA Pairs or Device Groups
Each Container Connector is uniquely suited to its specific container orchestration environment and purpose, utilizing the architecture and language appropriate for the environment. Application Developers interact with the platform’s API; the CCs watch the API for certain events, then act accordingly.
The Container Connector is stateless (Stateless means there is no record of previous interactions and each interaction request has to be handled based entirely on information that comes with it). The inputs are:
- the container orchestration environment’s config
- the BIG-IP device config
- the CC config (provided via the appropriate means from the container orchestration environment).
Wherever a Container Connector runs, it always watches the API and attempts to bring the BIG-IP up-to-date with the latest applicable configurations.
Managing BIG-IP HA Clusters in OpenShift
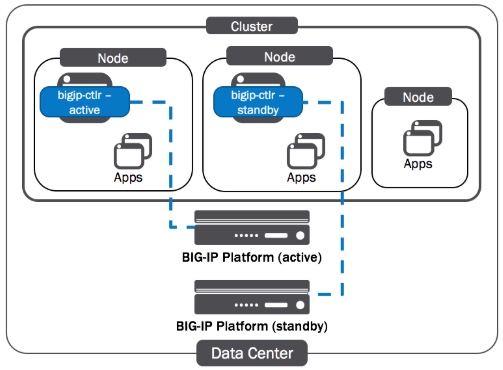
You can use the F5 Container Connectors (also called F5 BIG-IP Controller) to manage a BIG-IP HA active-standby pair or device group. The deployment details vary depending on the platform. For most, the basic principle is the same: You should run one BIG-IP Controller instance for each BIG-IP device. You will deploy two BIG-IP Controller instances - one for each BIG-IP device. To help ensure Controller HA, you will deploy each Controller instance on a separate Node in the cluster.
BIG-IP Config Sync
Important
Each Container Connector monitors the BIG-IP partition it manages for configuration changes. If its configuration changes, the Connector reapplies its own configuration to the BIG-IP. F5 does not recommend making configuration changes to objects in any partition managed by a F5 Container Connector via any other means (for example, the configuration utility, TMOS, or by syncing configuration from another device or service group). Doing so may result in disruption of service or unexpected behavior.
The Container Connector for OpenShift uses FDB entries and ARP records to identify the Cluster resources associated with BIG-IP Nodes. Because BIG-IP config sync doesn’t include FDB entries or ARP records, F5 does not recommend using automatic configuration sync when managing a BIG-IP HA pair or cluster with the F5 Container Connector. You must disable config sync when using tunnels.
Complete the steps below to set up the solution shown in the diagram. Be sure to use the correct IP addresses and subnet masks for your OpenShift Cluster
| Step | Task |
|---|---|
| Initial BIG-IP HA Setup | |
Upload the HostSubnet Files to the OpenShift API Server
|
|
Set up VXLAN on the BIG-IP Devices
|
|
Deploy the BIG-IP Controller (F5 Container Connector)
|
Initial BIG-IP HA Setup
Step 1:
The purpose of this lab is not to cover BIG-IP High Availability (HA) in depth but focus on OpenShift configuration with BIG-IP. Some prior BIG-IP HA knowledge is required. We have created the BIG-IPs base configuration for bigip01 and bigip02 to save time. Below is the initial configuration used on each BIG-IP:
Note
The following is provided for informational purposes. You do not need to run these commands for the lab.
bigip01.f5.local
tmsh modify sys global-settings hostname bigip01.f5.local
tmsh modify sys global-settings mgmt-dhcp disabled
tmsh create sys management-ip 10.10.200.98/24
tmsh create sys management-route 10.10.200.1
tmsh create net vlan external interfaces add {1.1}
tmsh create net vlan internal interfaces add {1.2}
tmsh create net vlan ha interfaces add {1.3}
tmsh create net self 10.10.199.98/24 vlan internal
tmsh create net self 10.10.201.98/24 vlan external
tmsh create net self 10.10.202.98/24 vlan ha allow-service default
tmsh create net route default gw 10.10.201.1
tmsh mv cm device bigip1 bigip01.f5.local
tmsh modify cm device bigip01.f5.local configsync-ip 10.10.202.98
tmsh modify cm device bigip01.f5.local unicast-address {{ip 10.10.202.98} {ip management-ip}}
tmsh modify cm trust-domain ca-devices add {10.10.200.99} username admin password admin
tmsh create cm device-group ocp-devicegroup devices add {bigip01.f5.local bigip02.f5.local} type sync-failover auto-sync disabled
tmsh run cm config-sync to-group ocp-devicegroup
tmsh save sys config
bigip02.f5.local
tmsh modify sys global-settings hostname bigip02.f5.local
tmsh modify sys global-settings mgmt-dhcp disabled
tmsh create sys management-ip 10.10.200.99/24
tmsh create sys management-route 10.10.200.1
tmsh create net vlan external interfaces add {1.1}
tmsh create net vlan internal interfaces add {1.2}
tmsh create net vlan ha interfaces add {1.3}
tmsh create net self 10.10.199.99/24 vlan internal
tmsh create net self 10.10.201.99/24 vlan external
tmsh create net self 10.10.202.99/24 vlan ha allow-service default
tmsh create net route default gw 10.10.201.1
tmsh modify sys global-settings gui-setup disabled
tmsh mv cm device bigip1 bigip02.f5.local
tmsh modify cm device bigip02.f5.local configsync-ip 10.10.202.99
tmsh modify cm device bigip02.f5.local unicast-address {{ip 10.10.202.99} {ip management-ip}}
tmsh save sys config
Tip
Before adding the BIG-IP devices to OpenShift make sure your High Availability (HA) device trust group, license, selfIP, vlans are configured correctly.
Note
You have shortcuts to connect to your BIG-IPs in Chrome. Login: admin, Password: admin
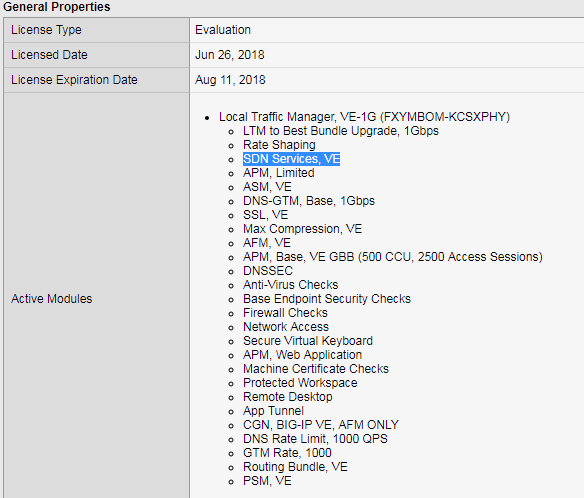
Validate that SDN services license is active
Attention
In your lab environment the BIG-IP VE LAB license includes the SDN license. The following is provided as a reference of what you may see in a production license. The SDN license is also included in the -V16 version of the BIG-IP VE license.
Validate the vlan configuration

Validate bigip01 self IP configuration

Validate bigip02 self IP configuration

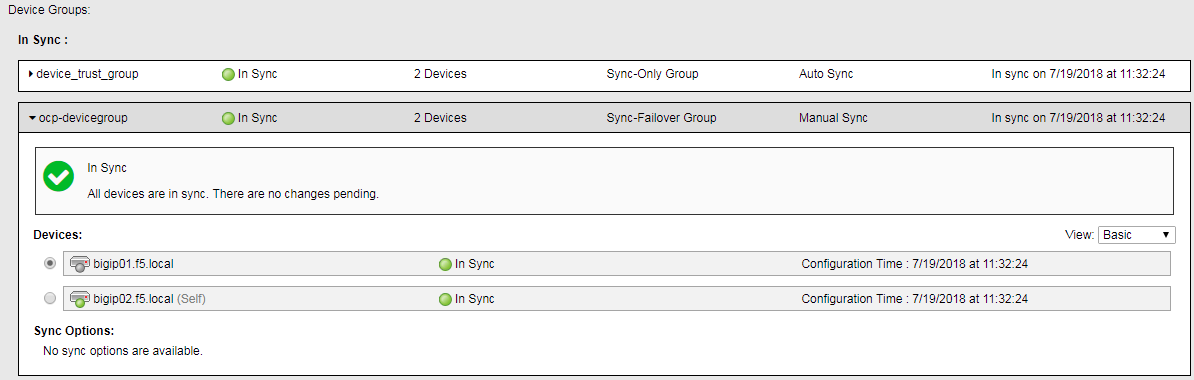
Validate the device group HA settings and make sure bigip01 and bigip02 are in sync. If out of sync, sync the bigip
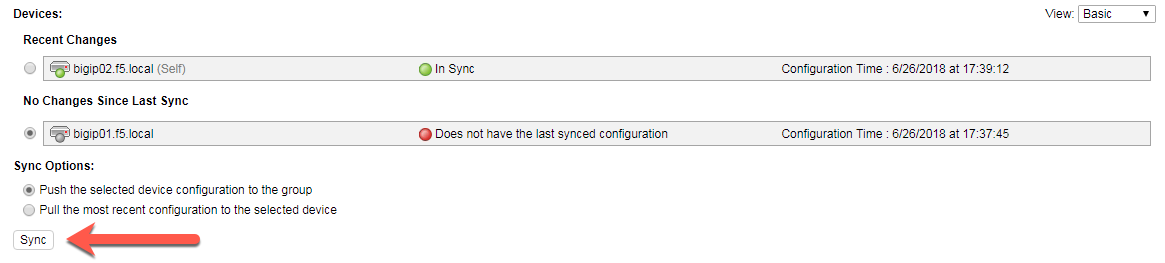
All synced. Note the sync-failover configuration is set to manual sync
The diagram below displays the BIG-IP deployment with the OpenShift cluster in High Availability (HA) active-standby pair or device group. Note this solution applies to BIG-IP devices v13.x and later only. To accomplish High Availability (HA) active-standby pair or device group with OpenShift the BIG-IP needs to create a floating vxlan tunnel address with is currently only available in BIG-IP 13.x and later.
Upload the HostSubnet Files to the OpenShift API Server
Step 2: Create a new OpenShift HostSubnet
HostSubnets must use valid YAML. You can upload the files individually using separate oc create commands.
Create one HostSubnet for each BIG-IP device. These will handle health monitor traffic.
Also create one HostSubnet to pass client traffic. You will create the floating IP address for the active device in this subnet as shown in the diagram above.
Attention
We have created the YAML files to save time. The files are located at /root/agility2018/ocp on the master (ose-master)
cd /root/agility2018/ocp
Define HostSubnets
hs-bigip01.yaml
{
    "apiVersion": "v1",
    "host": "openshift-f5-bigip01",
    "hostIP": "10.10.199.98",
    "kind": "HostSubnet",
    "metadata": {
        "name": "openshift-f5-bigip01"
    },
    "subnet": "10.131.0.0/23"
}
hs-bigip02.yaml
{
    "apiVersion": "v1",
    "host": "openshift-f5-bigip02",
    "hostIP": "10.10.199.99",
    "kind": "HostSubnet",
    "metadata": {
        "name": "openshift-f5-bigip02"
    },
    "subnet": "10.131.2.0/23"
}
hs-bigip-float.yaml
{
    "apiVersion": "v1",
    "host": "openshift-f5-bigip-float",
    "hostIP": "10.10.199.200",
    "kind": "HostSubnet",
    "metadata": {
        "name": "openshift-f5-bigip-float"
    },
    "subnet": "10.131.4.0/23"
}
Create the HostSubnet files to the OpenShift API server. Run the following commands from the master
oc create -f hs-bigip01.yaml
oc create -f hs-bigip02.yaml
oc create -f hs-bigip-float.yaml
Verify creation of the HostSubnets:
[root@ose-mstr01 ocp]# oc get hostsubnet
NAME                       HOST                       HOST IP         SUBNET          EGRESS IPS
openshift-f5-bigip-float   openshift-f5-bigip-float   10.10.199.200   10.131.4.0/23   []
openshift-f5-bigip01       openshift-f5-bigip01       10.10.199.98    10.131.0.0/23   []
openshift-f5-bigip02       openshift-f5-bigip02       10.10.199.99    10.131.2.0/23   []
ose-mstr01.f5.local        ose-mstr01.f5.local        10.10.199.100   10.130.0.0/23   []
ose-node01                 ose-node01                 10.10.199.101   10.128.0.0/23   []
ose-node02                 ose-node02                 10.10.199.102   10.129.0.0/23   []
[root@ose-mstr01 ocp]#
Set up VXLAN on the BIG-IP Devices
Important
The BIG-IP OpenShift Controller cannot manage objects in the /Common partition.
Its recommended to create all HA using the /Common partition
Tip
You can copy and paste the following commands to be run directly from the OpenShift master (ose-mstr01). To paste content into mRemoteNG; use your right mouse button.
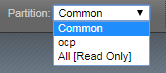
Step 3.1: Create a new partition on your BIG-IP system
- ssh root@10.10.200.98 tmsh create auth partition ocp
- ssh root@10.10.200.99 tmsh create auth partition ocp
Step 3.2: Creating ocp-profile
- ssh root@10.10.200.98 tmsh create net tunnels vxlan ocp-profile flooding-type multipoint
- ssh root@10.10.200.99 tmsh create net tunnels vxlan ocp-profile flooding-type multipoint
Step 3.3: Creating floating IP for underlay network
- ssh root@10.10.200.98 tmsh create net self 10.10.199.200/24 vlan internal traffic-group traffic-group-1
- ssh root@10.10.200.98 tmsh run cm config-sync to-group ocp-devicegroup
Step 3.4: Creating vxlan tunnel ocp-tunnel
- ssh root@10.10.200.98 tmsh create net tunnels tunnel ocp-tunnel key 0 profile ocp-profile local-address 10.10.199.200 secondary-address 10.10.199.98 traffic-group traffic-group-1
- ssh root@10.10.200.99 tmsh create net tunnels tunnel ocp-tunnel key 0 profile ocp-profile local-address 10.10.199.200 secondary-address 10.10.199.99 traffic-group traffic-group-1
Step 3.5: Creating overlay self-ip
- ssh root@10.10.200.98 tmsh create net self 10.131.0.98/14 vlan ocp-tunnel
- ssh root@10.10.200.99 tmsh create net self 10.131.2.99/14 vlan ocp-tunnel
Step 3.6: Creating floating IP for overlay network
- ssh root@10.10.200.98 tmsh create net self 10.131.4.200/14 vlan ocp-tunnel traffic-group traffic-group-1
- ssh root@10.10.200.98 tmsh run cm config-sync to-group ocp-devicegroup
Step 3.7: Saving configuration
- ssh root@10.10.200.98 tmsh save sys config
- ssh root@10.10.200.99 tmsh save sys config
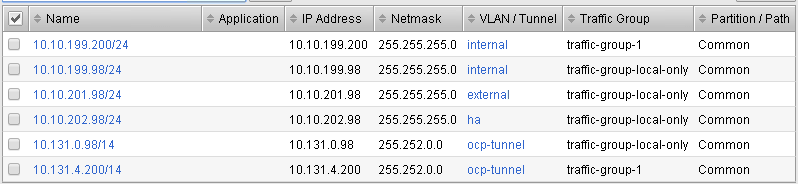
Before adding the BIG-IP controller to OpenShift validate the partition and tunnel configuration
Validate that the OCP bigip partition was created
Validate bigip01 self IP configuration
Note
On the active device, there is floating IP address in the subnet assigned by the OpenShift SDN.
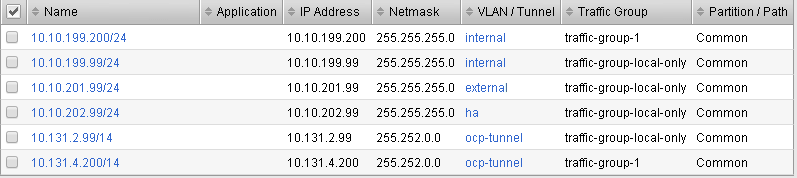
Validate bigip02 self IP configuration
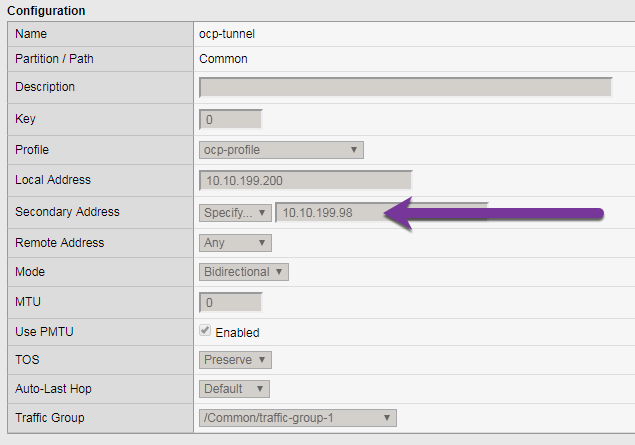
Check the ocp-tunnel configuration (under Network -> Tunnels). Note the local-address 10.10.199.200 and secondary-address are 10.10.199.98 for bigip01 and 10.10.199.99 for bigip02. The secondary-address will be used to send monitor traffic and the local address will be used by the active device to send client traffic.
Deploy the BIG-IP Controller (F5 Container Connector)
Take the steps below to deploy a contoller for each BIG-IP device in the cluster.
Set up RBAC
The F5 BIG-IP Controller requires permission to monitor the status of the OpenSfhift cluster. The following will create a “role” that will allow it to access specific resources.
You can create RBAC resources in the project in which you will run your BIG-IP Controller. Each Controller that manages a device in a cluster or active-standby pair can use the same Service Account, Cluster Role, and Cluster Role Binding.
Step 4.1: Create a Service Account for the BIG-IP Controller
[root@ose-mstr01 ocp]# oc create serviceaccount bigip-ctlr -n kube-system
serviceaccount "bigip-ctlr" created
Step 4.2: Create a Cluster Role and Cluster Role Binding with the required permissions.
The following file has already being created f5-kctlr-openshift-clusterrole.yaml which is located in /root/agility2018/ocp on the master
1 2 3 4 5 6 7 8 9 10 11 12 13 14 15 16 17 18 19 20 21 22 23 24 25 26 27 28 29 30 31 32 | # For use in OpenShift clusters
apiVersion: v1
kind: ClusterRole
metadata:
annotations:
authorization.openshift.io/system-only: "true"
name: system:bigip-ctlr
rules:
- apiGroups: ["", "extensions"]
resources: ["nodes", "services", "endpoints", "namespaces", "ingresses", "routes" ]
verbs: ["get", "list", "watch"]
- apiGroups: ["", "extensions"]
resources: ["configmaps", "events", "ingresses/status"]
verbs: ["get", "list", "watch", "update", "create", "patch" ]
- apiGroups: ["", "extensions"]
resources: ["secrets"]
resourceNames: ["<secret-containing-bigip-login>"]
verbs: ["get", "list", "watch"]
---
apiVersion: v1
kind: ClusterRoleBinding
metadata:
name: bigip-ctlr-role
userNames:
- system:serviceaccount:kube-system:bigip-ctlr
subjects:
- kind: ServiceAccount
name: bigip-ctlr
roleRef:
name: system:bigip-ctlr
|
[root@ose-mstr01 ocp]# oc create -f f5-kctlr-openshift-clusterrole.yaml
clusterrole "system:bigip-ctlr" created
clusterrolebinding "bigip-ctlr-role" created
Create Deployments
Step 4.3: Deploy the BIG-IP Controller
Create an OpenShift Deployment for each Controller (one per BIG-IP device). You need to deploy a controller for both f5-bigip-node01 and f5-bigip-node02
- Provide a unique metadata.name for each Controller.
- Provide a unique –bigip-url in each Deployment (each Controller manages a separate BIG-IP device).
- Use the same –bigip-partition in all Deployments.
bigip01-cc.yaml
1 2 3 4 5 6 7 8 9 10 11 12 13 14 15 16 17 18 19 20 21 22 23 24 25 26 27 28 29 30 31 32 33 34 35 36 37 38 39 40 41 42 43 44 45 | apiVersion: extensions/v1beta1
kind: Deployment
metadata:
name: bigip01-ctlr
namespace: kube-system
spec:
replicas: 1
template:
metadata:
name: k8s-bigip-ctlr1
labels:
app: k8s-bigip-ctlr1
spec:
serviceAccountName: bigip-ctlr
containers:
- name: k8s-bigip-ctlr
image: "f5networks/k8s-bigip-ctlr:latest"
command: ["/app/bin/k8s-bigip-ctlr"]
args: [
"--credentials-directory=/tmp/creds",
"--bigip-url=10.10.200.98",
"--bigip-partition=ocp",
"--pool-member-type=cluster",
"--manage-routes=true",
"--node-poll-interval=5",
"--verify-interval=5",
"--namespace=demoproj",
"--namespace=yelb",
"--namespace=guestbook",
"--namespace=f5demo",
"--route-vserver-addr=10.10.201.120",
"--route-http-vserver=ocp-vserver",
"--route-https-vserver=ocp-https-vserver",
"--openshift-sdn-name=/Common/ocp-tunnel"
]
volumeMounts:
- name: bigip-creds
mountPath: "/tmp/creds"
readOnly: true
volumes:
- name: bigip-creds
secret:
secretName: bigip-login
imagePullSecrets:
- name: f5-docker-images
|
bigip02-cc.yaml
1 2 3 4 5 6 7 8 9 10 11 12 13 14 15 16 17 18 19 20 21 22 23 24 25 26 27 28 29 30 31 32 33 34 35 36 37 38 39 40 41 42 43 44 45 | apiVersion: extensions/v1beta1
kind: Deployment
metadata:
name: bigip02-ctlr
namespace: kube-system
spec:
replicas: 1
template:
metadata:
name: k8s-bigip-ctlr1
labels:
app: k8s-bigip-ctlr1
spec:
serviceAccountName: bigip-ctlr
containers:
- name: k8s-bigip-ctlr
image: "f5networks/k8s-bigip-ctlr:latest"
command: ["/app/bin/k8s-bigip-ctlr"]
args: [
"--credentials-directory=/tmp/creds",
"--bigip-url=10.10.200.99",
"--bigip-partition=ocp",
"--pool-member-type=cluster",
"--manage-routes=true",
"--node-poll-interval=5",
"--verify-interval=5",
"--namespace=demoproj",
"--namespace=yelb",
"--namespace=guestbook",
"--namespace=f5demo",
"--route-vserver-addr=10.10.201.120",
"--route-http-vserver=ocp-vserver",
"--route-https-vserver=ocp-https-vserver",
"--openshift-sdn-name=/Common/ocp-tunnel"
]
volumeMounts:
- name: bigip-creds
mountPath: "/tmp/creds"
readOnly: true
volumes:
- name: bigip-creds
secret:
secretName: bigip-login
imagePullSecrets:
- name: f5-docker-images
|
[root@ose-mstr01 ocp]# oc create -f  bigip01-cc.yaml
deployment "bigip01-ctlr" created
[root@ose-mstr01 ocp]# oc create -f  bigip02-cc.yaml
deployment "bigip02-ctlr" created
Step 4.4: Verify Pod creation
Verify the deployment and pods that are created
[root@ose-mstr01 ocp]# oc get deployment -n kube-system
NAME           DESIRED   CURRENT   UP-TO-DATE   AVAILABLE   AGE
bigip01-ctlr   1         1         1            1           42s
bigip02-ctlr   1         1         1            1           36s
Note
Check in your lab that you have your two controllers as AVAILABLE. If Not, you won’t be able to do the lab. It may take up to 10 minutes for them to be available
[root@ose-mstr01 ocp]# oc get deployment bigip01-ctlr -n kube-system
NAME           DESIRED   CURRENT   UP-TO-DATE   AVAILABLE   AGE
bigip01-ctlr   1         1         1            1           1m
[root@ose-mstr01 ocp]# oc get pods -n kube-system
NAME                           READY     STATUS    RESTARTS   AGE
bigip01-ctlr-242733768-dbwdm   1/1       Running   0          1m
bigip02-ctlr-66171581-q87kb    1/1       Running   0          1m
[root@ose-mstr01 ocp]#
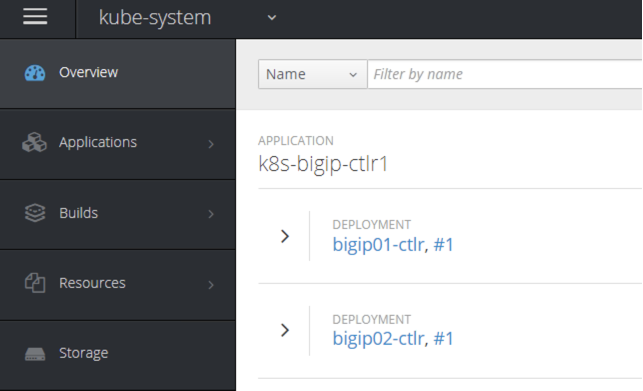
You can also use the web console in OpenShift to view the bigip controller (login: demouser, password: demouser). Go the kube-system project
Upload the Deployments
Step 4.5: Upload the Deployments to the OpenShift API server. Use the pool-only configmap to configuration project namespace: f5demo on the bigip
pool-only.yaml
1 2 3 4 5 6 7 8 9 10 11 12 13 14 15 16 17 18 19 20 21 22 23 24 25 26 27 28 29 30 31 32 33 34 35 36 37 38 39 | kind: ConfigMap
apiVersion: v1
metadata:
# name of the resource to create on the BIG-IP
name: k8s.poolonly
# the namespace to create the object in
# As of v1.1, the k8s-bigip-ctlr watches all namespaces by default
# If the k8s-bigip-ctlr is watching a specific namespace(s),
# this setting must match the namespace of the Service you want to proxy
# -AND- the namespace(s) the k8s-bigip-ctlr watches
namespace: f5demo
labels:
# the type of resource you want to create on the BIG-IP
f5type: virtual-server
data:
schema: "f5schemadb://bigip-virtual-server_v0.1.7.json"
data: |
{
"virtualServer": {
"backend": {
"servicePort": 8080,
"serviceName": "f5demo",
"healthMonitors": [{
"interval": 3,
"protocol": "http",
"send": "GET /\r\n",
"timeout": 10
}]
},
"frontend": {
"virtualAddress": {
"port": 80
},
"partition": "ocp",
"balance": "round-robin",
"mode": "http"
}
}
}
|
[root@ose-mstr01 ocp]# oc create -f pool-only.yaml
configmap "k8s.poolonly" created
[root@ose-mstr01 ocp]#
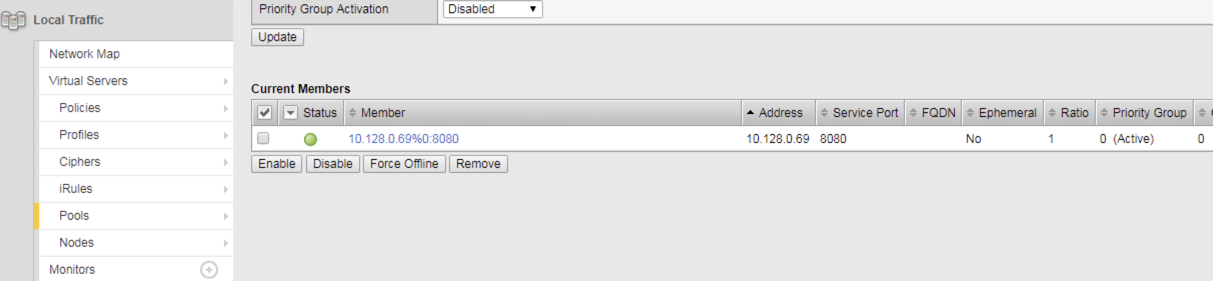
Step 4.6: Check bigip01 and bigip02 to make sure the pool got created (make sure you are looking at the “ocp” partition). Validate that green
Step 4.7: Increase the replicas of the f5demo project pods. Replicas specified the required number of instances to run
[root@ose-mstr01 ocp]# oc scale --replicas=10 deployment/f5demo -n f5demo
deployment "f5demo" scaled
[root@ose-mstr01 ocp]#
Note
It may take time to have your replicas up and running. Don’t hesitate to track this by using the following command. to check the number of AVAILABLE instances:
oc get deployment f5demo -n f5demo
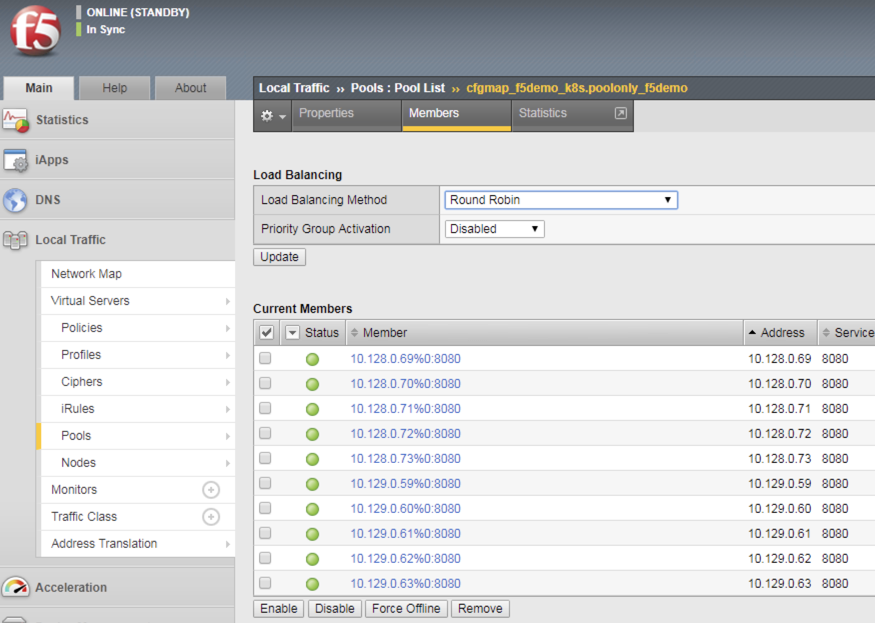
Validate that bigip01 and bigip02 are updated with the additional pool members and their health monitor works. If the monitor is failing check the tunnel and selfIP.
Validation and Troubleshooting
Now that you have HA configured and uploaded the deployment, it is time to generate traffic through our BIG-IPs.
Step 5.1: Create a virtual IP address for the deployment
Add a virtual IP to the the configmap. You can edit the pool-only.yaml configmap. There are multiple ways to edit the configmap which will be covered in module 3. In this task remove the deployment, edit the yaml file and re-apply the deployment
[root@ose-mstr01 ocp]# oc delete -f pool-only.yaml
configmap "k8s.poolonly" deleted
[root@ose-mstr01 ocp]#
Edit the pool-only.yaml and add the bindAddr
vi pool-only.yaml
"frontend": {
   "virtualAddress": {
      "port": 80,
      "bindAddr": "10.10.201.220"
Tip
Do not use TAB in the file, only spaces. Don’t forget the “,” at the end of the “”port”: 80,” line.
Create the modified pool-only deployment
[root@ose-mstr01 ocp]# oc create -f pool-only.yaml
configmap "k8s.poolonly" created
[root@ose-mstr01 ocp]#
Connect to the virtual server at http://10.10.201.220. Does the connection work? If not, try the following troubleshooting options:
- Capture the http request to see if the connection is established with the BIG-IP
- Follow the following network troubleshooting section
Network Troubleshooting
Attention
How do I verify connectivity between the BIG-IP VTEP and the OSE Node?
Ping the Node’s VTEP IP address. Use the
-sflag to set the MTU of the packets to allow for VxLAN encapsulation.[root@bigip01:Standby:Changes Pending] config # ping -s 1600 -c 4 10.10.199.101 PING 10.10.199.101 (10.10.199.101) 1600(1628) bytes of data. 1608 bytes from 10.10.199.101: icmp_seq=1 ttl=64 time=2.94 ms 1608 bytes from 10.10.199.101: icmp_seq=2 ttl=64 time=2.21 ms 1608 bytes from 10.10.199.101: icmp_seq=3 ttl=64 time=2.48 ms 1608 bytes from 10.10.199.101: icmp_seq=4 ttl=64 time=2.47 ms --- 10.10.199.101 ping statistics --- 4 packets transmitted, 4 received, 0% packet loss, time 3006ms rtt min/avg/max/mdev = 2.210/2.527/2.946/0.267 ms
Ping the Pod’s IP address (use the output from looking at the pool members in the previous steps). Use the
-sflag to set the MTU of the packets to allow for VxLAN encapsulation.[root@bigip01:Standby:Changes Pending] config # ping -s 1600 -c 4 10.128.0.54 PING 10.128.0.54 (10.128.0.54) 1600(1628) bytes of data. --- 10.128.0.54 ping statistics --- 4 packets transmitted, 0 received, 100% packet loss, time 12999ms
Now change the MTU to 1400
[root@bigip01:Standby:Changes Pending] config # ping -s 1400 -c 4 10.128.0.54
PING 10.128.0.54 (10.128.0.54) 1400(1428) bytes of data.
1408 bytes from 10.128.0.54: icmp_seq=1 ttl=64 time=1.74 ms
1408 bytes from 10.128.0.54: icmp_seq=2 ttl=64 time=2.43 ms
1408 bytes from 10.128.0.54: icmp_seq=3 ttl=64 time=2.77 ms
1408 bytes from 10.128.0.54: icmp_seq=4 ttl=64 time=2.25 ms

--- 10.128.0.54 ping statistics ---
4 packets transmitted, 4 received, 0% packet loss, time 3005ms
rtt min/avg/max/mdev = 1.748/2.303/2.774/0.372 ms
Note
When pinging the VTEP IP directly the BIG-IP was L2 adjacent to the device and could send a large MTU.
In the second example, the packet is dropped across the VxLAN tunnel.
In the third example, the packet is able to traverse the VxLAN tunnel.
In a TMOS shell, output the REST requests from the BIG-IP logs.
Do a
tcpdumpof the underlay network.Example showing two-way communication between the BIG-IP VTEP IP and the OSE node VTEP IPs.
Example showing traffic on the overlay network; at minimum, you should see BIG-IP health monitors for the Pod IP addresses.
[root@bigip01:Standby:Changes Pending] config # tcpdump -i ocp-tunnel -c 10 -nnn
tcpdump: verbose output suppressed, use -v or -vv for full protocol decode
listening on ocp-tunnel, link-type EN10MB (Ethernet), capture size 65535 bytes
09:05:55.962408 IP 10.131.0.98.53404 > 10.128.0.54.8080: Flags [S], seq 1597206142, win 29200, options [mss 1460,sackOK,TS val 441031289 ecr 0,nop,wscale 7], length 0 out slot1/tmm0 lis=
09:05:55.963532 IP 10.128.0.54.8080 > 10.131.0.98.53404: Flags [S.], seq 1644640677, ack 1597206143, win 27960, options [mss 1410,sackOK,TS val 3681001 ecr 441031289,nop,wscale 7], length 0 in slot1/tmm1 lis=
09:05:55.964361 IP 10.131.0.98.53404 > 10.128.0.54.8080: Flags [.], ack 1, win 229, options [nop,nop,TS val 441031291 ecr 3681001], length 0 out slot1/tmm0 lis=
09:05:55.964367 IP 10.131.0.98.53404 > 10.128.0.54.8080: Flags [P.], seq 1:10, ack 1, win 229, options [nop,nop,TS val 441031291 ecr 3681001], length 9: HTTP: GET / out slot1/tmm0 lis=
09:05:55.965630 IP 10.128.0.54.8080 > 10.131.0.98.53404: Flags [.], ack 10, win 219, options [nop,nop,TS val 3681003 ecr 441031291], length 0 in slot1/tmm1 lis=
09:05:55.975754 IP 10.128.0.54.8080 > 10.131.0.98.53404: Flags [P.], seq 1:1337, ack 10, win 219, options [nop,nop,TS val 3681013 ecr 441031291], length 1336: HTTP: HTTP/1.1 200 OK in slot1/tmm1 lis=
09:05:55.975997 IP 10.128.0.54.8080 > 10.131.0.98.53404: Flags [F.], seq 1337, ack 10, win 219, options [nop,nop,TS val 3681013 ecr 441031291], length 0 in slot1/tmm1 lis=
09:05:55.976108 IP 10.131.0.98.53404 > 10.128.0.54.8080: Flags [.], ack 1337, win 251, options [nop,nop,TS val 441031302 ecr 3681013], length 0 out slot1/tmm0 lis=
09:05:55.976114 IP 10.131.0.98.53404 > 10.128.0.54.8080: Flags [F.], seq 10, ack 1337, win 251, options [nop,nop,TS val 441031303 ecr 3681013], length 0 out slot1/tmm0 lis=
09:05:55.976488 IP 10.131.0.98.53404 > 10.128.0.54.8080: Flags [.], ack 1338, win 251, options [nop,nop,TS val 441031303 ecr 3681013], length 0 out slot1/tmm0 lis=
10 packets captured
10 packets received by filter
0 packets dropped by kernel
In a TMOS shell, view the MAC address entries for the OSE tunnel. This will show the mac address and IP addresses of all of the OpenShift endpoints.
root@(bigip02)(cfg-sync In Sync)(Active)(/Common)(tmos)# show /net fdb tunnel ocp-tunnel

----------------------------------------------------------------
Net::FDB
Tunnel      Mac Address        Member                    Dynamic
----------------------------------------------------------------
ocp-tunnel  0a:0a:0a:0a:c7:64  endpoint:10.10.199.100%0  no
ocp-tunnel  0a:0a:0a:0a:c7:65  endpoint:10.10.199.101%0  no
ocp-tunnel  0a:0a:0a:0a:c7:66  endpoint:10.10.199.102%0  no
ocp-tunnel  0a:58:0a:80:00:60  endpoint:10.10.199.101    yes
In a TMOS shell, view the ARP entries.
Note
run the command “tmsh” if you do not see “(tmos)” in your shell.
This will show all of the ARP entries; you should see the VTEP entries on the
ocpvlanand the Pod IP addresses onose-tunnel.root@(bigip02)(cfg-sync In Sync)(Active)(/Common)(tmos)# show /net arp -------------------------------------------------------------------------------------------- Net::Arp Name Address HWaddress Vlan Expire-in-sec Status -------------------------------------------------------------------------------------------- 10.10.199.100 10.10.199.100 2c:c2:60:49:b2:9d /Common/internal 41 resolved 10.10.199.101 10.10.199.101 2c:c2:60:58:62:64 /Common/internal 70 resolved 10.10.199.102 10.10.199.102 2c:c2:60:51:65:a0 /Common/internal 41 resolved 10.10.202.98 10.10.202.98 2c:c2:60:1f:74:62 /Common/ha 64 resolved 10.128.0.96 10.128.0.96 0a:58:0a:80:00:60 /Common/ocp-tunnel 7 resolved root@(bigip02)(cfg-sync In Sync)(Active)(/Common)(tmos)#
Validate floating traffic for ocp-tunnel self-ip
Check if the configuration is correct from step 3.6. Make sure the floating IP is set to traffic-group-1 floating. A floating traffic group is request for the response traffic from the pool-member. If the traffic is local change to floating
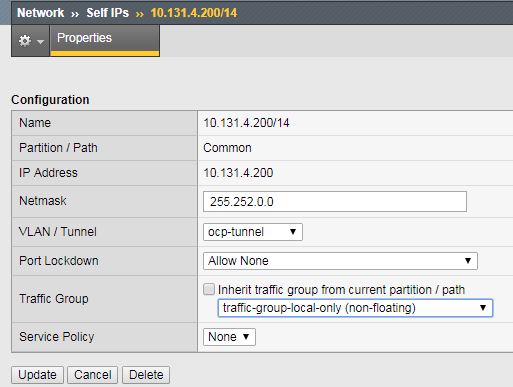
change to floating

Connect to the viutal IP address
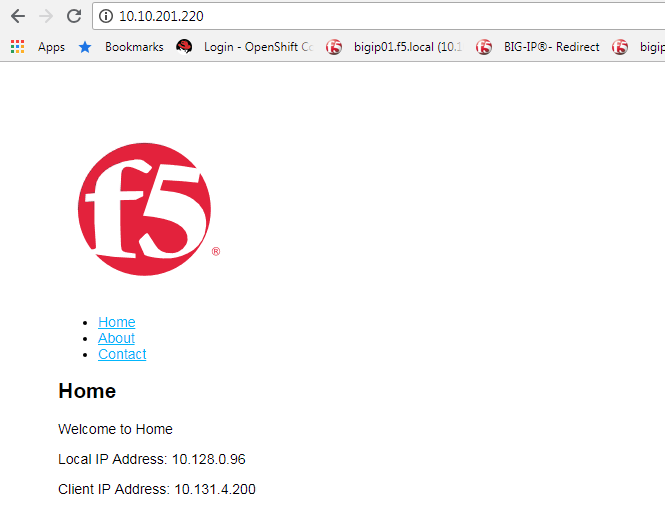
Test failover and make sure you can connect to the virtual.
Congratulations for completing the HA clustering setup. Before moving to the next module cleanup the deployed resource:
[root@ose-mstr01 ocp]# oc delete -f pool-only.yaml
configmap "k8s.poolonly" created
[root@ose-mstr01 ocp]#