Module 3: Container Connector in Action
This section of the lab will cover creating OpenShift resources that the F5 Container Connector will process and use to update the BIG-IP configuration and leverages the work you did in the previous sections.
Operational Overview
The Container Connector watches for events being generated by the Openshift API server and takes action when it sees an OpenShift ConfigMap or Route resource that has an F5-specific label defined. The Container Connector parses the ConfigMap or Route resource and updates the BIG-IP configuration to match the desired state as defined by those resources.
In addition to watching and responding to events in real time, the Container Connector periodically queries the OpenShift API for the current status and updates the BIG-IP as needed. This interval (verify-interval) is 30 seconds by default but is a startup value that can be modified.
An instance of the Container Connector can watch for changes in all namespaces (projects), a single namespace or a discrete list of namespaces. Additionally, an instance of the Container Connector is configured to make configuration changes in a single non-Common BIG-IP partition.
OpenShift runs on top of Kubernetes and the same Container Connector works for both, but many of the Container Connector features apply to both while some apply only to OpenShift, like Routes, while others, like Ingress, apply only to Kubernetes.
You can find detailed information about configuring, deploying and using the F5 Container Connector as well as configuration options for ConfigMaps and Routes https://clouddocs.f5.com/containers/v2/#
Additionally, you can get more detailed information about an OpenShift command by using oc <command> -help. So, for example, if you wanted to find out more about the oc create command, you would do the following:
[root@ose-mstr01 garrison]# oc create -help
In the following exercises, you will create the following OpenShift resource types:
- ConfigMaps
- Routes
Additionally, you will also create variations of each resource type.
Note
You will use the same Windows jumpbox as you used in the previous sections to complete the exercises in this section.
Unless otherwise noted, all the resource definition yaml files have been pre-created and can be found on the ose-master server under /root/agility2018/apps/module3
Exercise 1: ConfigMap - Basic
An OpenShift ConfigMap is one of the resource types that the F5 Container Connector watches for. The Container Connector will read the ConfigMap and create a virtual server, node(s), a pool, pool member(s) and a pool health monitor.
In this exercise, you will create a ConfigMap that defines the objects that the Container Connector should configure on the BIG-IP.
To complete this exercise, you will perform the following steps:
- Step 1: Deploy demo application
- Step 2: Create a service to expose the demo application
- Step 3: Create a ConfigMap that declares desired BIG-IP configuration
- Step 4: Review the BIG-IP configuration
- Step 5: Test the application
- Step 6: Scale the application
- Step 7: Test the scaled application
- Step 8: Cleanup deployed resources
Step 1: Deploy demo application
From the ose-master, review the following Deployment configuration: f5-demo-app-deployment.yaml
1 2 3 4 5 6 7 8 9 10 11 12 13 14 15 16 17 18 | apiVersion: extensions/v1beta1
kind: Deployment
metadata:
name: f5-demo-app
namespace: f5demo
spec:
replicas: 1
template:
metadata:
labels:
app: f5-demo-app
spec:
containers:
- name: f5-demo-app
image: chen23/f5-demo-app:openshift
ports:
- containerPort: 8080
protocol: TCP
|
Now that you have reviewed the Deployment,you need to actually create the Deployment by deploying it to OpenShift by using the oc create command.
From ose-master server, run the following command:
Attention
Be sure to change the working directory on ose-mstr01:
cd /root/agility2018/apps/module3
[root@ose-mstr01 module3]# oc create -f f5-demo-app-deployment.yaml
deployment "f5-demo-app" created
Step 2: Create Service to expose application
In order for an application to be accessible outside of the OpenShift cluster, a Service must be created. The Service uses a label selector to reference the application to be exposed. Additionally, the service also specifies the container port (8080) that the application is listening on.
From ose-master, review the following Service: f5-demo-app-service.yaml
1 2 3 4 5 6 7 8 9 10 11 12 13 14 | apiVersion: v1
kind: Service
metadata:
name: f5-demo-app
labels:
name: f5-demo-app
namespace: f5demo
spec:
type: ClusterIP
ports:
- port: 8080
targetPort: 8080
selector:
app: f5-demo-app
|
Now that you have reviewed the Service,you need to actually create the Service by deploying it to OpenShift by using the oc create command.
From ose-master server, run the following command:
[root@ose-mstr01 module3]# oc create -f f5-demo-app-service.yaml
service "f5-demo-app" created
Step 3: Create ConfigMap
A ConfigMap is used to define the BIG-IP objects that need to be created to enable access to the application via the BIG-IP.
The label, f5type: virtual-server, in the ConfigMap definition is what triggers the F5 Container Connector to process this ConfigMap.
In addition to the label, there are several F5-specific sections defined:
- virtualServer: Beginning of F5-specific configuration
- backend: Represents the server-side of the virtual server definition
- healthMonitors: Health monitor definition for the pool
- frontend: Represents the client-side of the virtual server
- virtualAddress: IP address and port of virtual server
A ConfigMap points to a Service which points to one or more Pods where the application is running.
From ose-master, review the ConfigMap resource f5-demo-app-configmap.yaml
1 2 3 4 5 6 7 8 9 10 11 12 13 14 15 16 17 18 19 20 21 22 23 24 25 26 27 28 29 30 31 32 33 34 35 36 37 38 39 40 41 | kind: ConfigMap
apiVersion: v1
metadata:
# name of the resource to create on the BIG-IP
name: f5-demo-app
# The namespace to create the object in.
# The k8s-bigip-ctlr watches all namespaces by default (as of v1.1).
# If the k8s-bigip-ctlr is watching a specific namespace(s),
# this setting must match the namespace of the Service you want to proxy
# -AND- the namespace(s) the k8s-bigip-ctlr watches.
namespace: f5demo
labels:
# tells the k8s-bigip-ctlr to watch this ConfigMap
f5type: virtual-server
data:
# NOTE: schema v0.1.4 is required as of k8s-bigip-ctlr v1.3.0
schema: "f5schemadb://bigip-virtual-server_v0.1.7.json"
data: |
{
"virtualServer": {
"backend": {
"servicePort": 8080,
"serviceName": "f5-demo-app",
"healthMonitors": [{
"interval": 30,
"protocol": "http",
"send": "GET /\r\n",
"timeout": 120
}]
},
"frontend": {
"virtualAddress": {
"port": 80,
"bindAddr": "10.10.201.130"
},
"partition": "ocp",
"balance": "least-connections-node",
"mode": "http"
}
}
}
|
Attention
Knowledge Check: How does the BIG-IP know which pods make up the application?
Now that you have reviewed the ConfigMap, you need to actually create the ConfigMap by deploying it to OpenShift by using the oc create command:
[root@ose-mstr01 module3]# oc create -f f5-demo-app-configmap.yaml
configmap "f5-demo-app" created
Step 4: Review BIG-IP configuration
In this step, you will examine the BIG-IP configuration that was created by the Container Connector when it processed the ConfigMap created in the previous step.
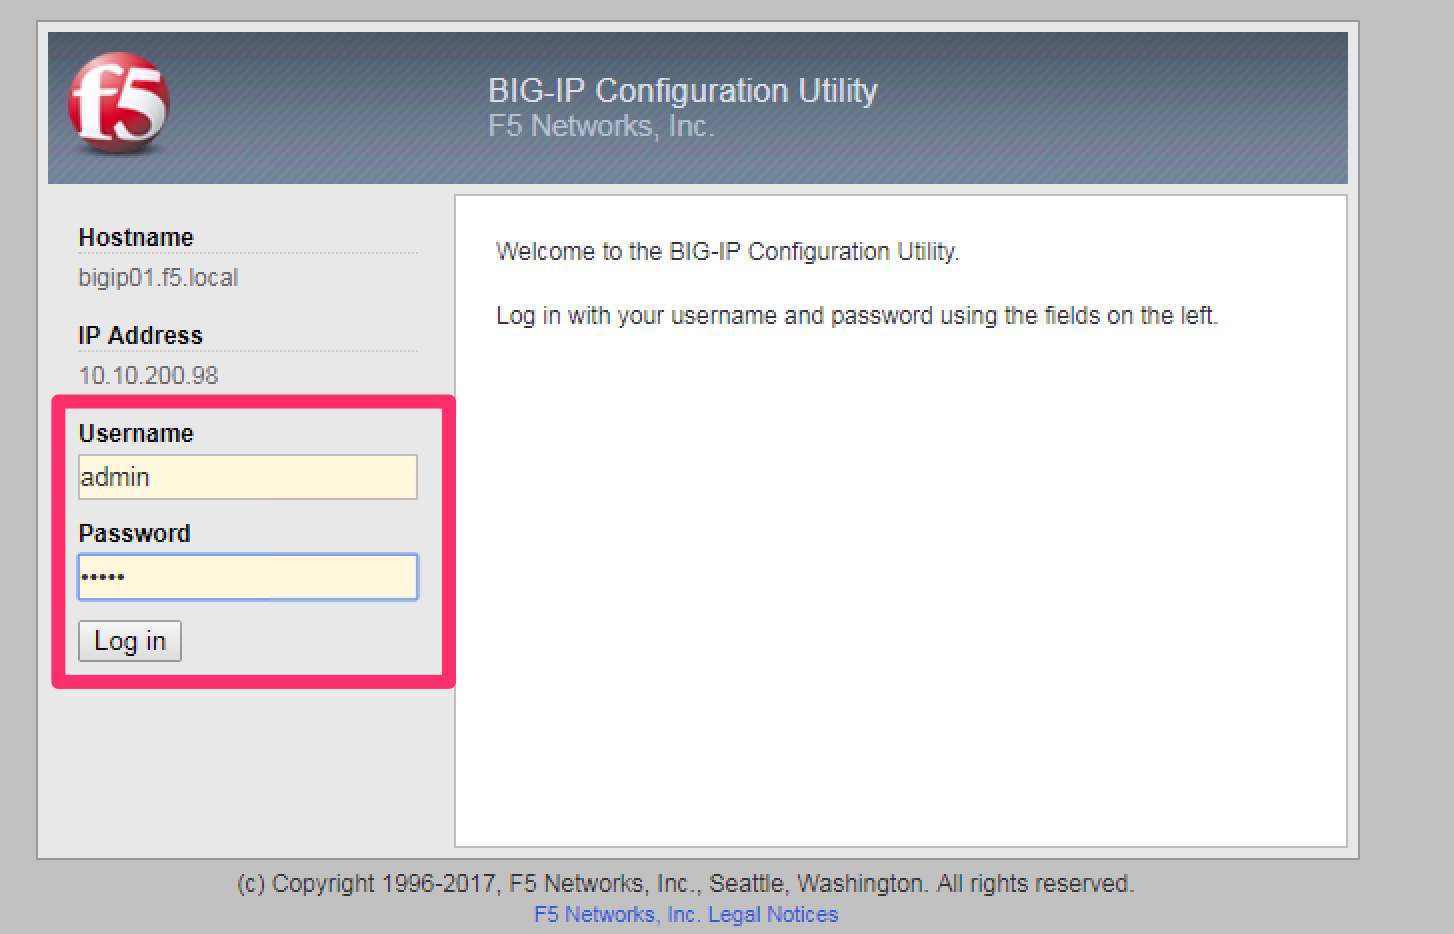
Launch the Chrome browser and click on the bookmark named bigip01.f5.local to access the BIG-IP GUI:

From the BIG-IP login page, enter username=admin and password=admin and click the Log in button:
Navigate to Local Traffic –> Network Map and change the partition to ocp using the dropdown in the upper right. The network map view shows a virtual server, pool and pool member. All of these objects were created by the Container Connector using the declarations defined in the ConfigMap.
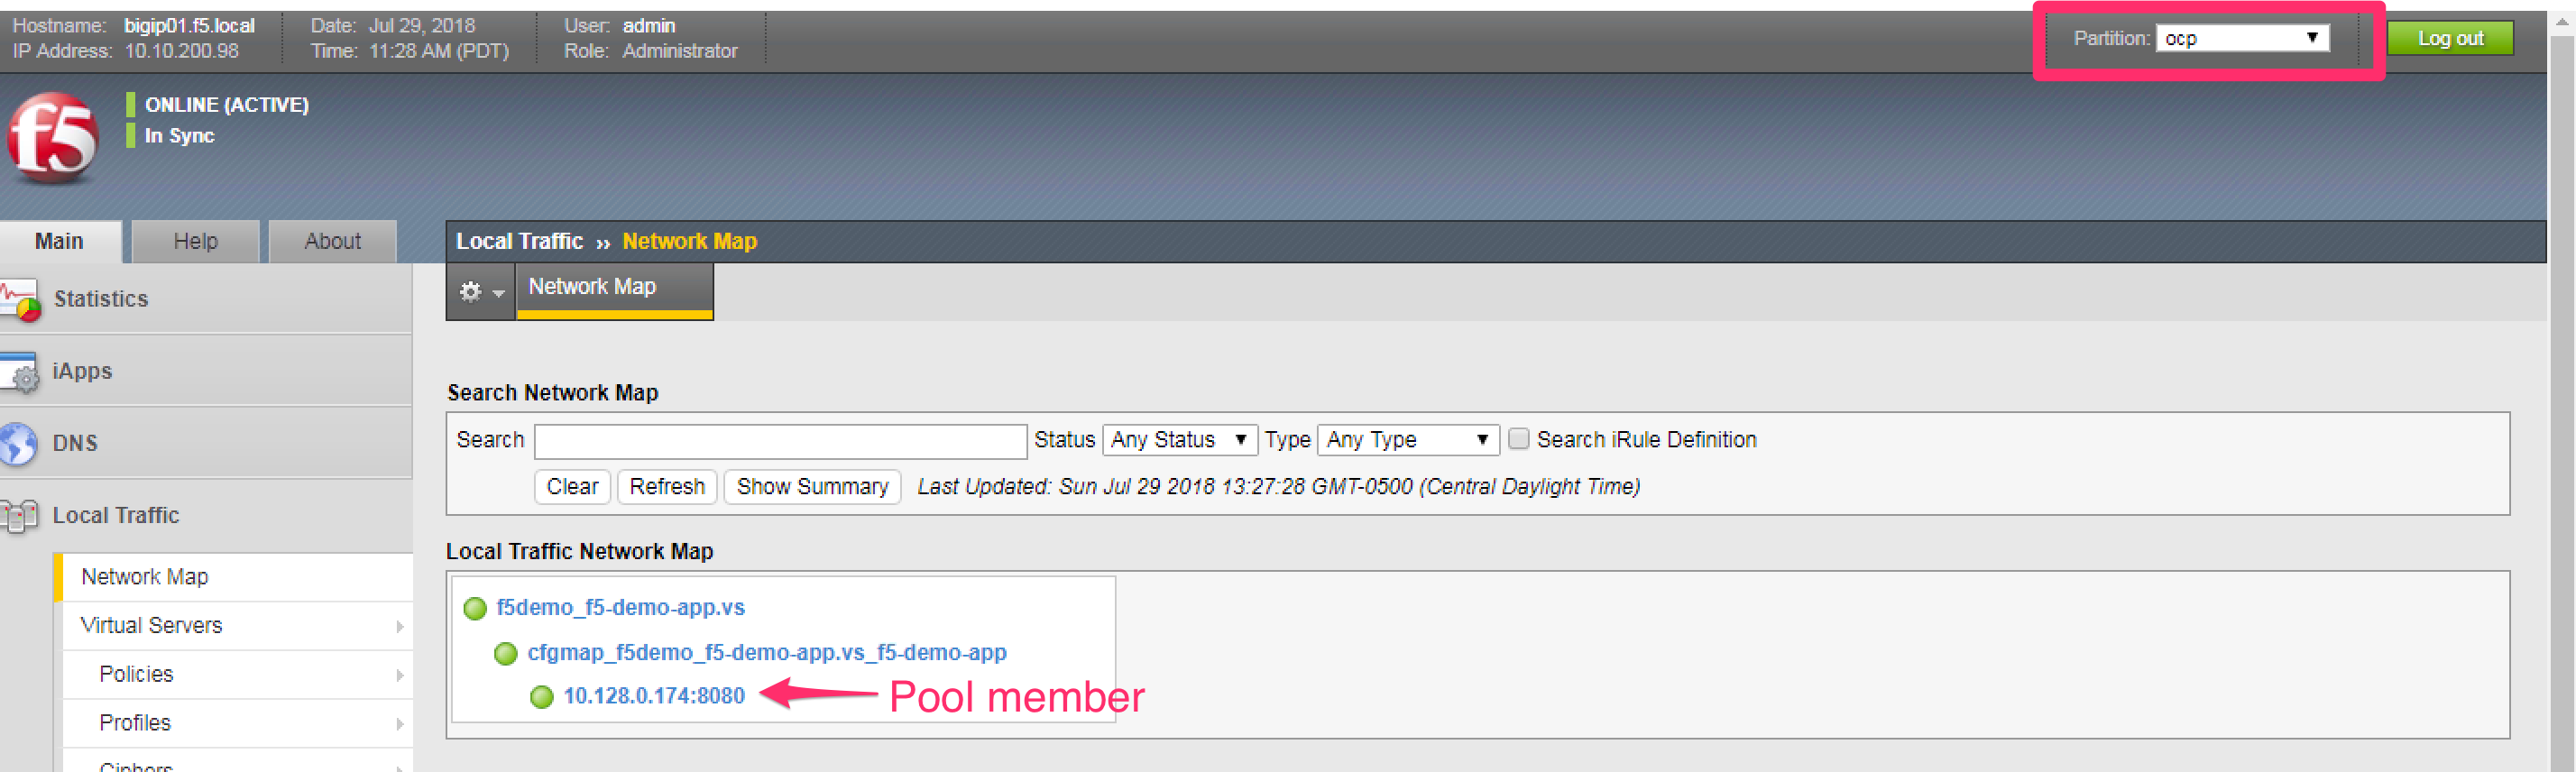
Attention
Knowledge Check: In the network map view, what OpenShift object type does the pool member IP address represent? How was the IP address assigned?
To view the IP address of the virtual server, hover your cursor over the name of the virtual server:
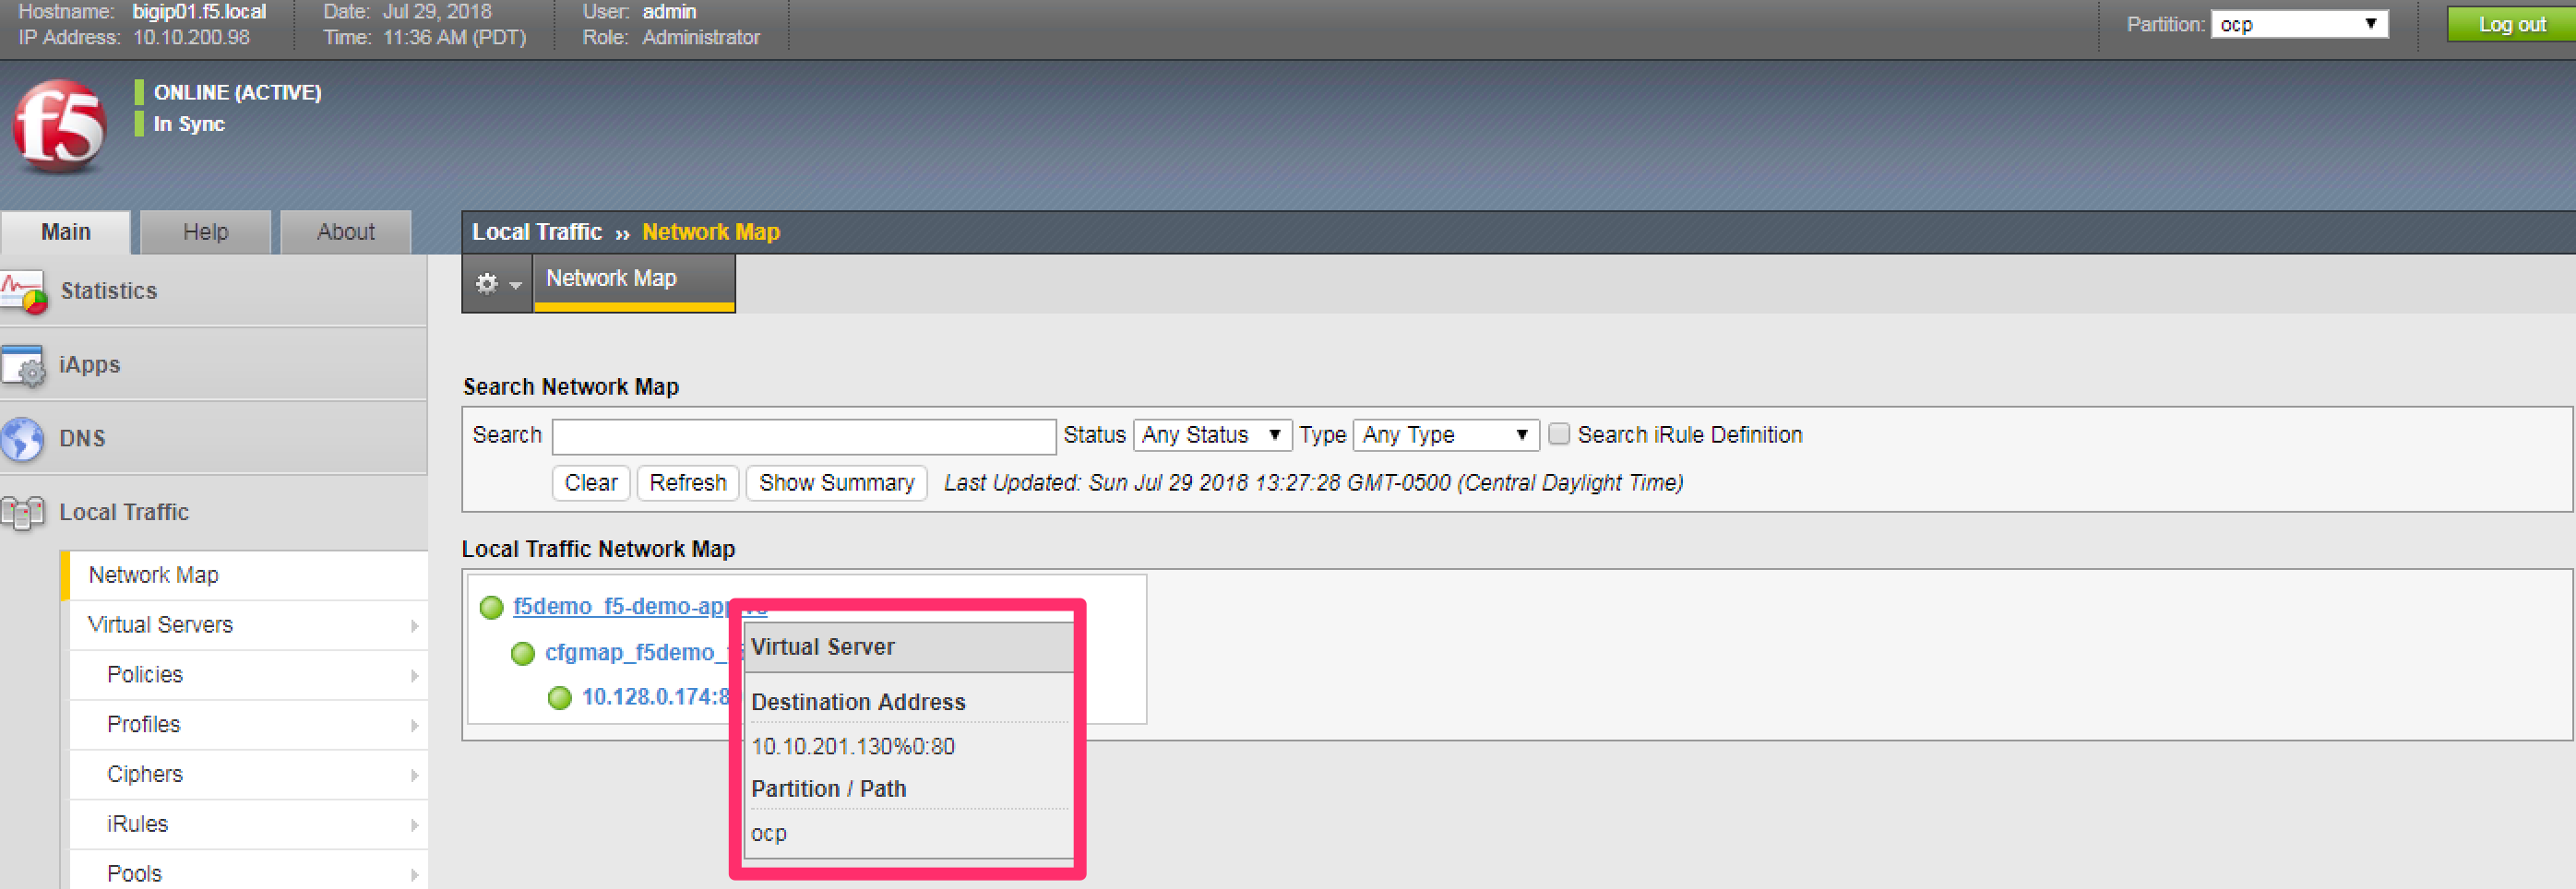
Attention
Knowledge Check: What OpenShift resource type was used to define the virtual server IP address?
Step 5: Test the application
In this step, you will use the Chrome browser to access the application you previously deployed to OpenShift.
Open a new browser tab and enter the IP address assigned to the virtual server in to the address bar:

Note
On the application page, the Server IP is the pool member (pod) IP address; the Server Port is the port of the virtual server; and the Client IP is the IP address of the Windows jumpbox you are using.
Step 6: Scale the application
The application deployed in step #1 is a single replica (instance). In this step,you are going to increase the number of replicas and then check the BIG-IP configuration to see what’s changed.
When the deployment replica count is scaled up or scaled down, an OpenShift event is generated and the Container Connector sees the event and adds or removes pool members as appropriate.
To scale the number of replicas, you will use the OpenShift oc scale command. You will be scaling the demo app deployment and so You first need to get the name of the deployment.
From ose-master, issue the following command:
[root@ose-mstr01 module3]# oc get deployment -n f5demo
NAME          DESIRED   CURRENT   UP-TO-DATE   AVAILABLE   AGE
f5-demo-app   1         1         1            1           1m
You can see from the output that the deployment is named f5-demo-app. You will use that name for the next command.
From the ose-master host, entering the following command to set the replica count for the deployment to 10 instances:
[root@ose-mstr01 module3]# oc scale --replicas=10 deployment/f5-demo-app -n f5demo
deployment "f5-demo-app" scaled
Step 7: Review the BIG-IP configuration
In this step, you will examine the BIG-IP configuration for changes that occured after the application was scaled up.
Navigate to Local Traffic –> Network Map and change the partition to ocp using the dropdown in the upper right.
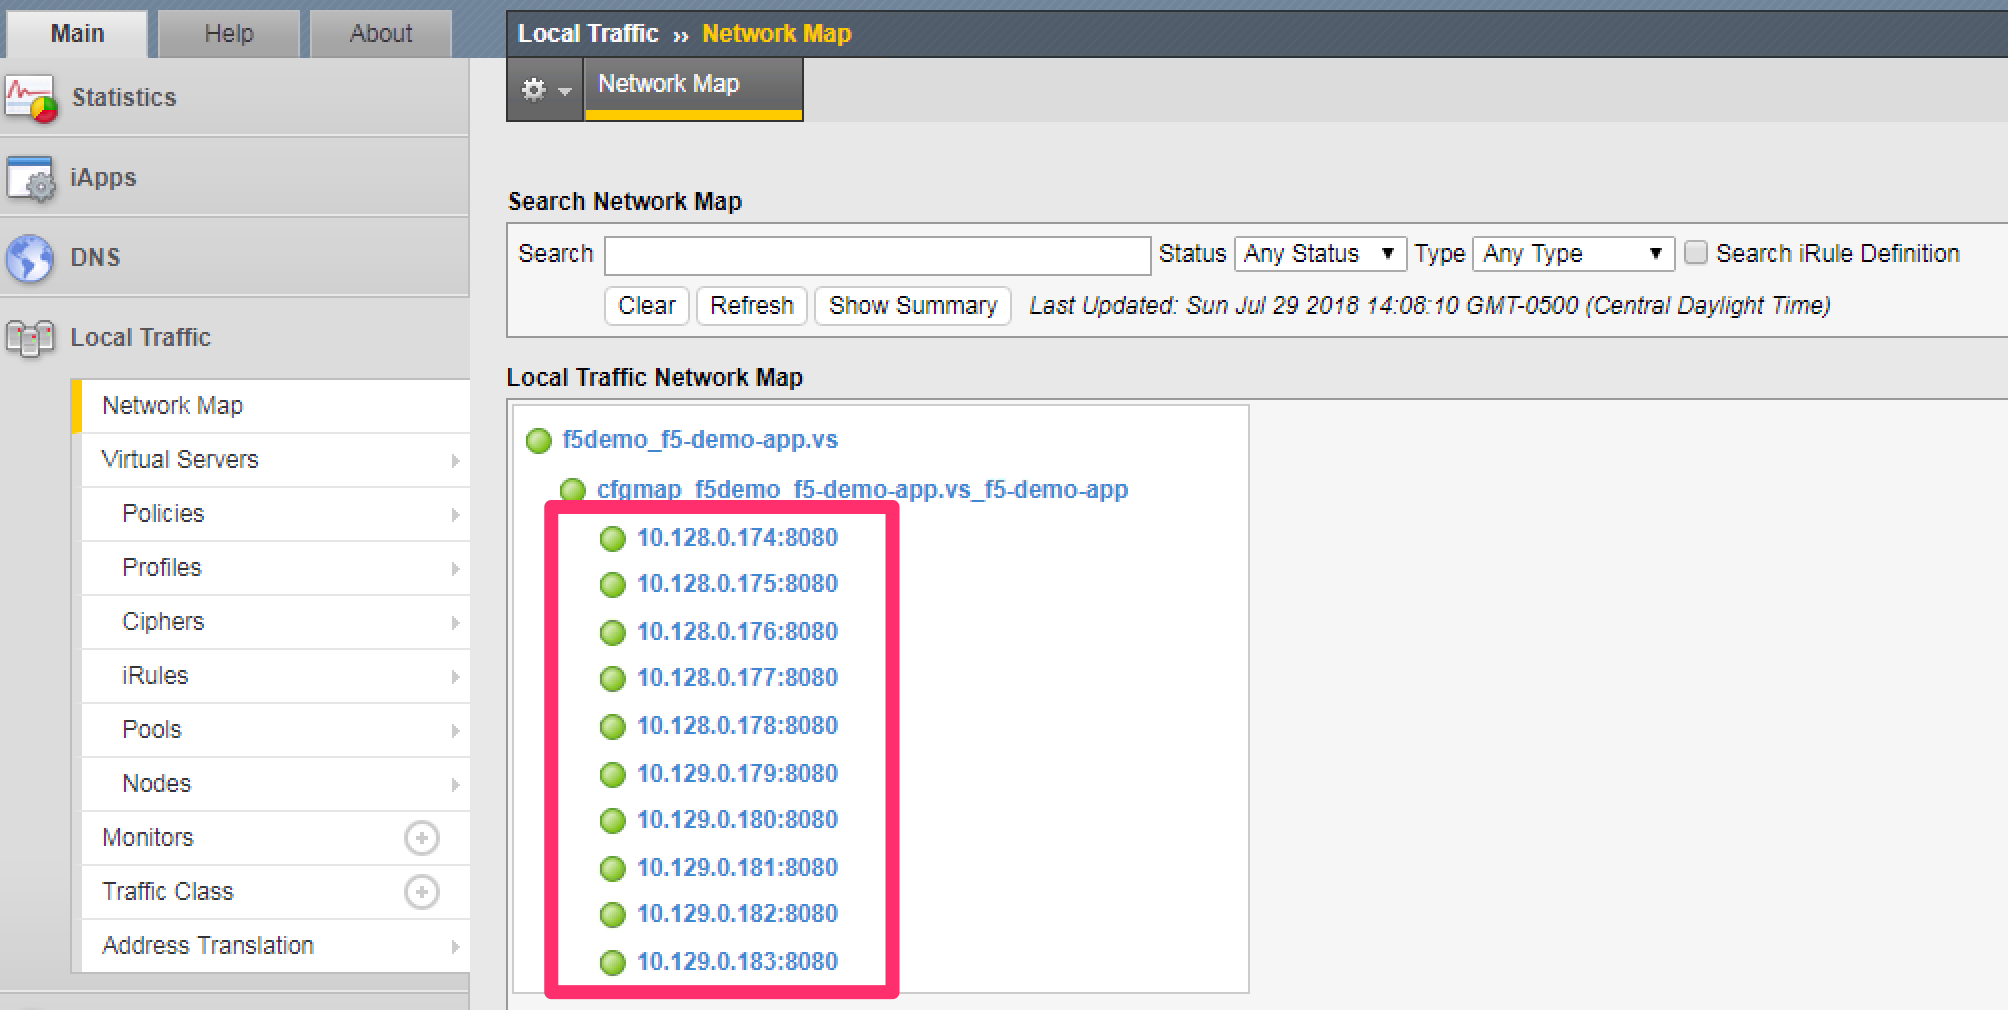
Attention
Knowledge Check: How many pool members are shown in the network map view? What do you think would happen if you scaled the deployment back to one replica?
Step 8: Test the scaled application
In this step, you will use the Chrome browser to access the application that you scaled to 10 replicas in the previous step.
Open a new Chrome browser tab and enter the IP address assigned to the virtua server in to the address bar:
If you reload the page every few seconds, you should see the Server IP address change. Because there is more than one instance of the application running, the BIG-IP load balances the application traffic amongst multiple pods.
Step 9: Cleanup deployed resources
In this step, you will remove the OpenShift Deployment, Service and ConfigMap resources you created in the previous steps using the OpenShift oc delete command.
From ose-master server, issue the following commands:
[root@ose-mstr01 tmp]# oc delete -f f5-demo-app-configmap.yaml
configmap "f5-demo-app" deleted

[root@ose-mstr01 tmp]# oc delete -f f5-demo-app-deployment.yaml
deployment "f5-demo-app" deleted

[root@ose-mstr01 module3]# oc delete -f f5-demo-app-service.yaml
service "f5-demo-app" deleted
Exercise 2: Route - Basic
An OpenShift Route is one of the resource types that the F5 Container Connector watches for. A Route defines a hostname or URI mapping to an application. For example, the hostname “customer.example.com” could map to the application “customer”, hostname “catalog.example.com”, might map to the application “catalog”, etc.
Similarly, a Route can refer to a URI path so, for example, the URI path “/customer” might map to the application called “customer” and URI path “/catalog”, might map to the application called “catalog”. If a Route only specifies URI paths, the Route applies to all HTTP request hostnames.
Additionally, a Route can refer to both a hostname and a URI path such as mycompany.com/customer or mycompany.com/catalog
The F5 Container Connector reads the Route resource and creates a virtual server, node(s), a pool per route path and pool members. Additionally, the Container Connector creates a layer 7 BIG-IP traffic policy and associates it with the virtual server. This layer 7 traffic policy evaluates the hostname or URI path from the request and forwards the traffic to the pool associated with that path.
A Route points to a Service which points to one or more Pods where the application is running.
Note
All Route resources share two virtual servers:
- ose-vserver for HTTP traffic, and
- https-ose-vserver for HTTPS traffic
The Container Connector assigns the names shown above by default. To set custom names, define route-http-vserver and route-https-vserver in the BIG-IP Container Connector Deployment. Please see the documentation at: http://clouddocs.f5.com for more details.
To complete this exercise, you will perform the following steps:
- Step 1: Deploy demo application and associated Service
- Step 2: Create a Route that defines routing rules based on hostname
- Step 3: Review the BIG-IP configuration
Step 1: Deploy demo application and its associated Service
In the previous exercise, you created the Deployment and Service separately.
This step demonstrates creating both the Deployment and the Service from
single configuration file. A separator of 3 dashes (---) is used to
separate one resource definition from the next resource definition.
From ose-master, review the following deployment: f5-demo-app-route-deployment.yaml
1 2 3 4 5 6 7 8 9 10 11 12 13 14 15 16 17 18 19 20 21 22 23 24 25 26 27 28 29 30 31 32 | apiVersion: extensions/v1beta1
kind: Deployment
metadata:
name: f5-demo-app-route
spec:
replicas: 1
template:
metadata:
labels:
app: f5-demo-app-route
spec:
containers:
- name: f5-demo-app-route
image: chen23/f5-demo-app:openshift
ports:
- containerPort: 8080
protocol: TCP
---
apiVersion: v1
kind: Service
metadata:
name: f5-demo-app-route
labels:
name: f5-demo-app-route
namespace: f5demo
spec:
type: ClusterIP
ports:
- port: 8080
targetPort: 8080
selector:
app: f5-demo-app-route
|
Now that you have reviewed the Deployment, you need to actually create it by deploying it to OpenShift by using the oc create command:
[root@ose-mstr01 tmp]# oc create -f f5-demo-app-route-deployment.yaml -n f5demo
deployment "f5-demo-app-route" created
service "f5-demo-app-route" created
Step 2: Create OpenShift Route
In this step, you will create an OpenShift Route.
From ose-master server, review the following Route: f5-demo-app-route-route.yaml
1 2 3 4 5 6 7 8 9 10 11 12 13 14 15 16 17 18 19 20 21 22 23 24 25 26 27 | apiVersion: v1
kind: Route
metadata:
labels:
name: f5-demo-app-route
name: f5-demo-app-route
namespace: f5demo
annotations:
# Specify a supported BIG-IP load balancing mode
virtual-server.f5.com/balance: least-connections-node
virtual-server.f5.com/health: |
[
{
"path": "mysite.f5demo.com/",
"send": "HTTP GET /",
"interval": 5,
"timeout": 10
}
]
spec:
host: mysite.f5demo.com
path: "/"
port:
targetPort: 8080
to:
kind: Service
name: f5-demo-app-route
|
Attention
Knowledge Check: How does the Container Connector know what application the Route refers to?
Now that you have reviewed the Route, you need to actually create it by deploying it to OpenShift by using the oc create command:
[root@ose-mstr01 tmp]# oc create -f f5-demo-app-route-route.yaml -n f5demo
route "f5-demo-app-route" created
Step 3: Review the BIG-IP configuration
In this step, you will examine the BIG-IP configuration for changes that occured after the the OpenShift Route was deployoed.
Using the Chrome browser, navigate to Local Traffic –> Network Map and change the partition to ocp using the dropdown in the upper right.

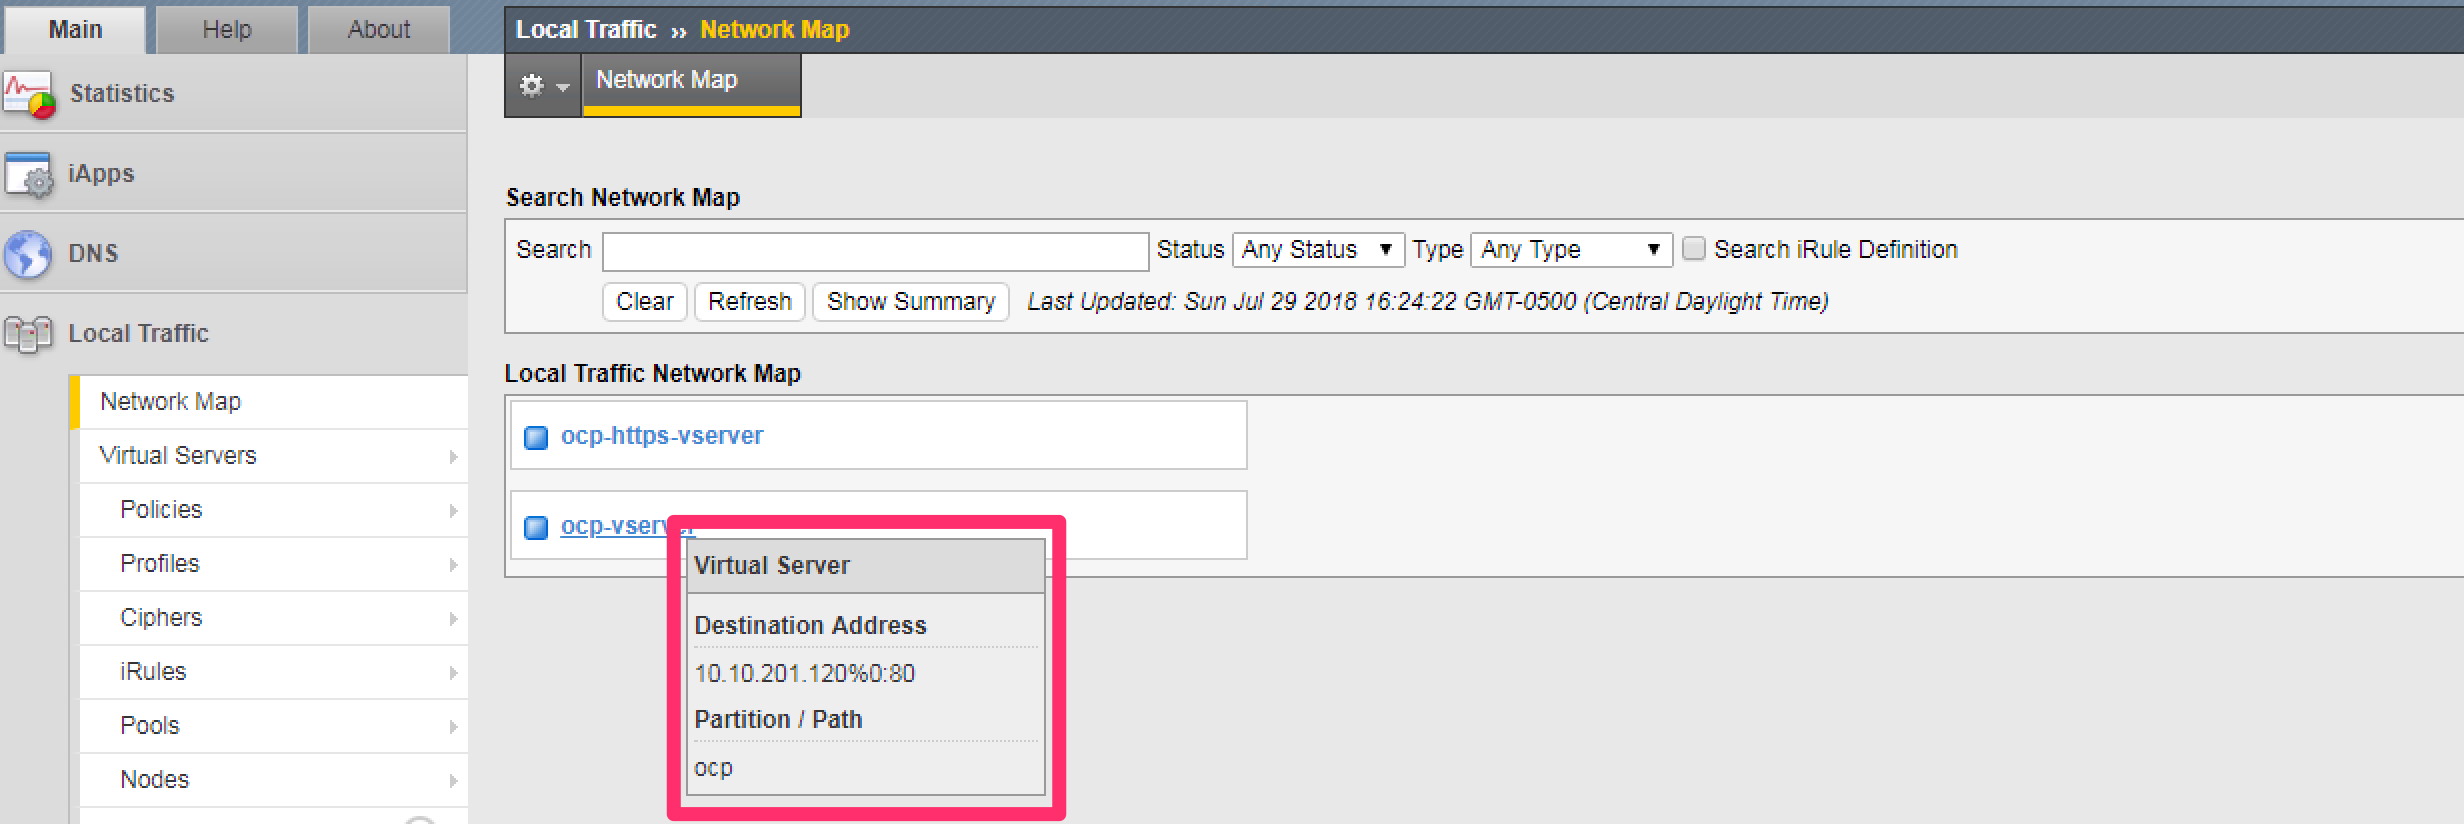
The network map view shows two virtual servers that were created by the Container Connector when it procssed the Route resource created in the previous step. One virtual server is for HTTP client traffic and the other virtual server is for HTTPS client traffic.
To view the IP address of the virtual server, hover your cursor over the virtual server named ocp-vserver
Attention
Knowledge Check: Which OpenShift resource type defines the names of the two virtual servers?
Next, you will view the traffic policy that was created by the Container Connector when it processed the OpenShift Route.
Navigate to Local Traffic –> Policies –> Policy List and change the partition to ocp using the dropdown in the upper right.
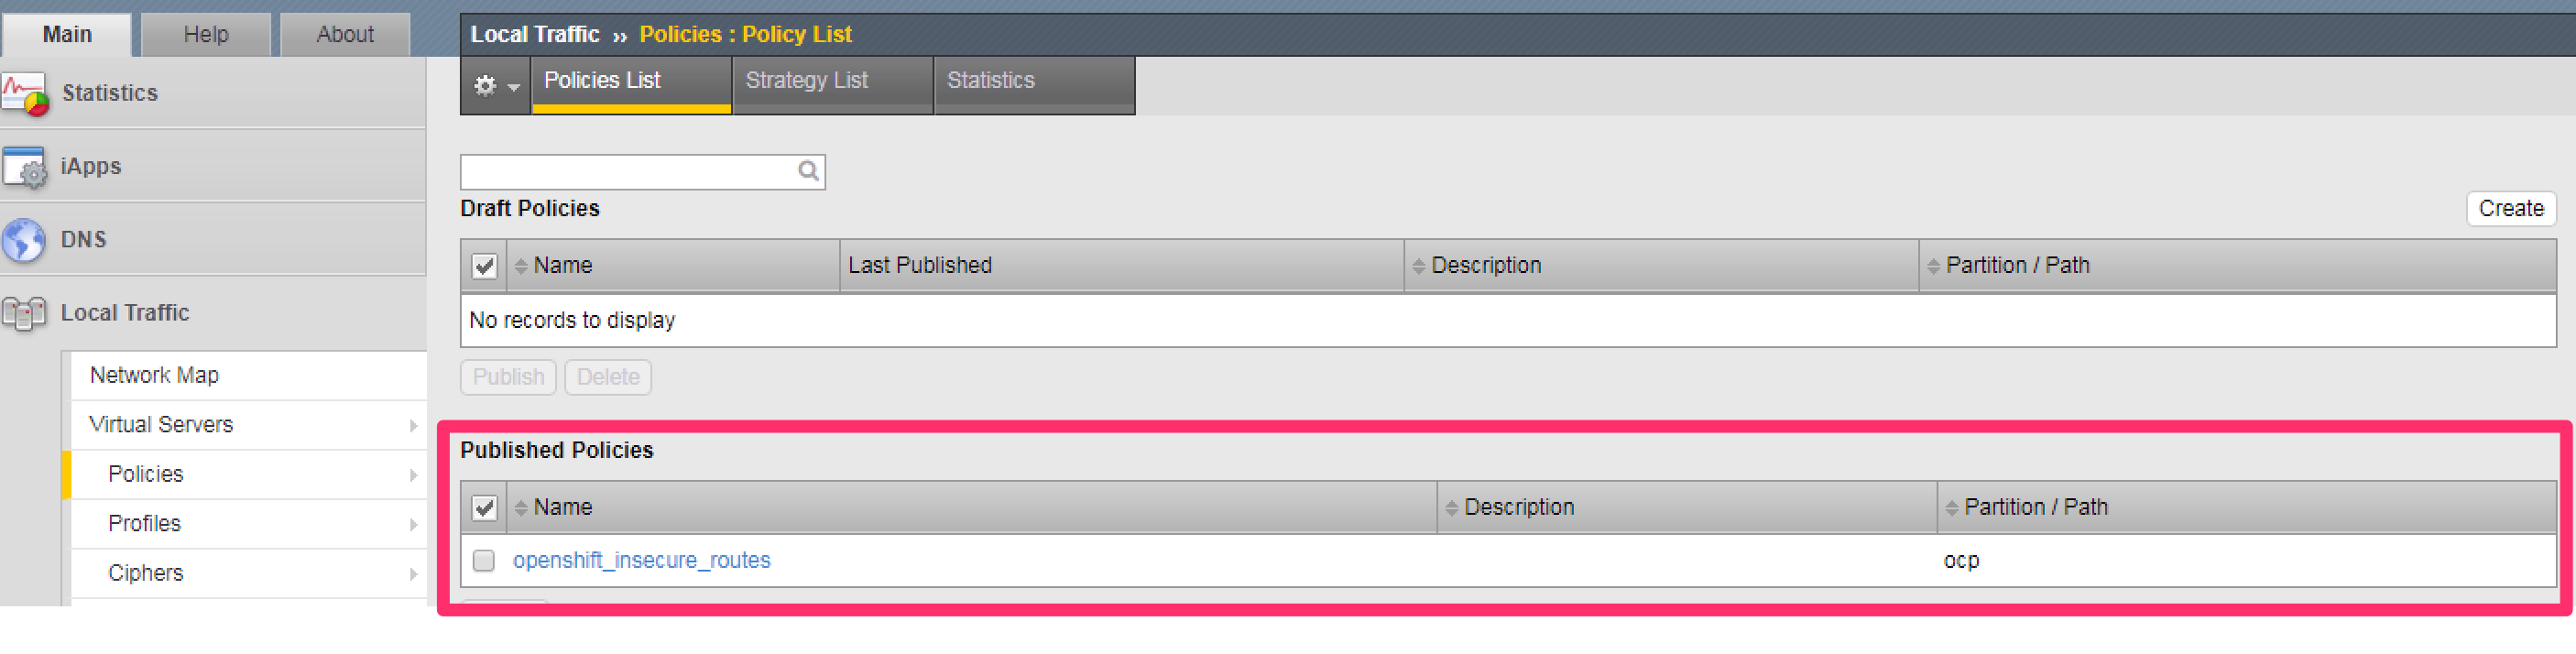
Click on the traffic policy listed uner Published Policies to view the policy page for the selected policy:
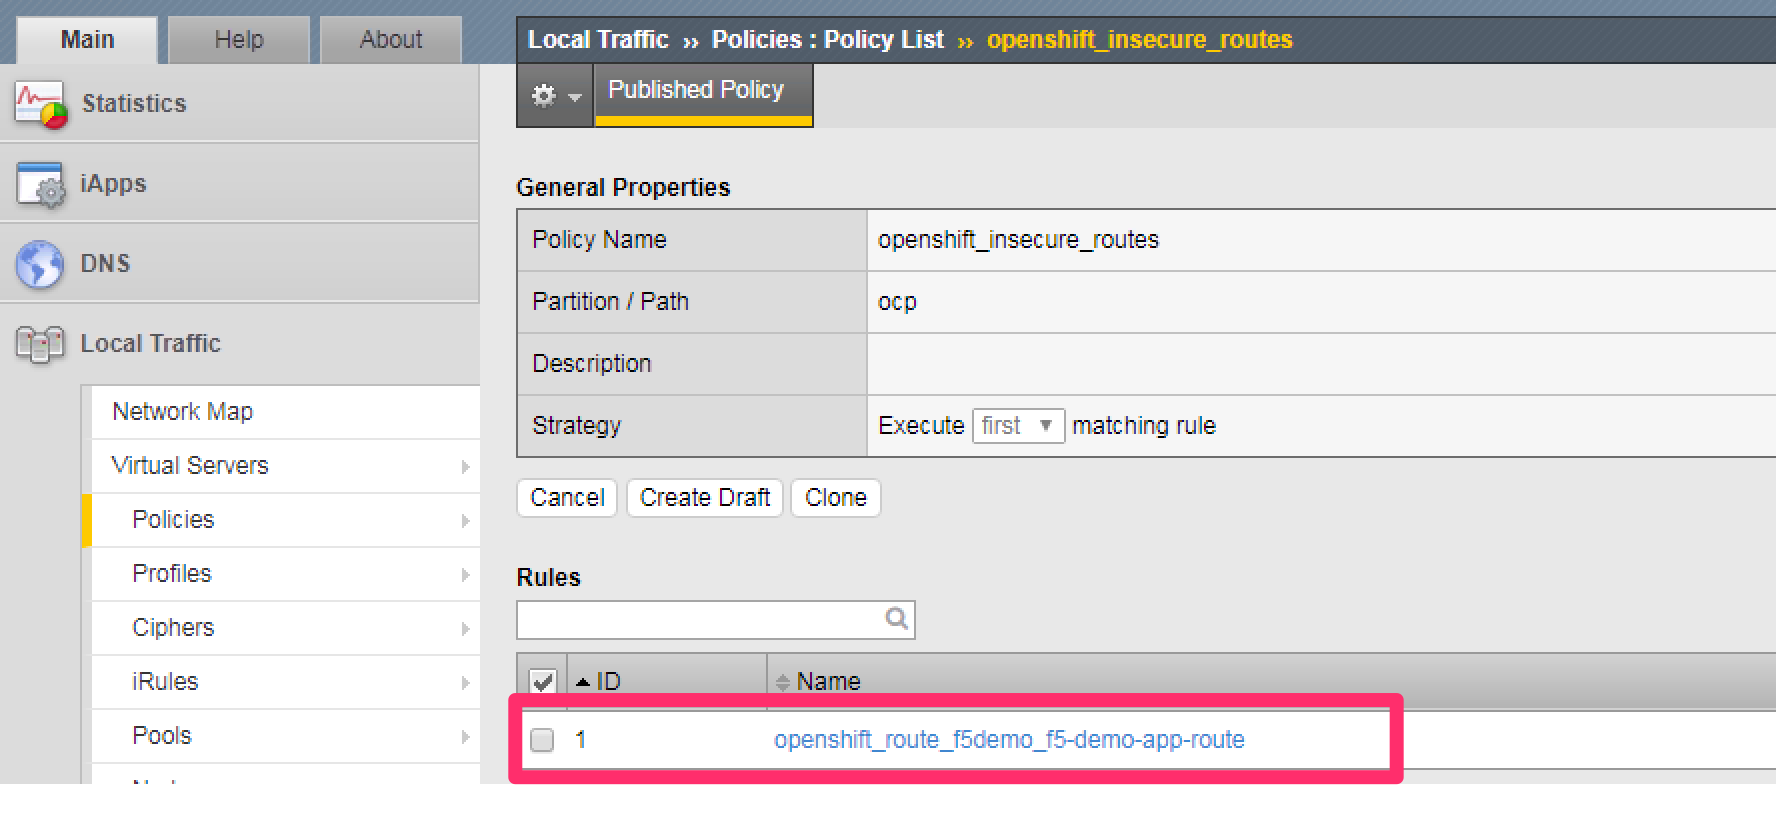
Next, click on the rule name listed under the Rules section of the policy page to view the rule page for the selected rule:
Warning
Due to the version of TMOS used in this lab you will not see the correct “hostname” due to a GUI issue.
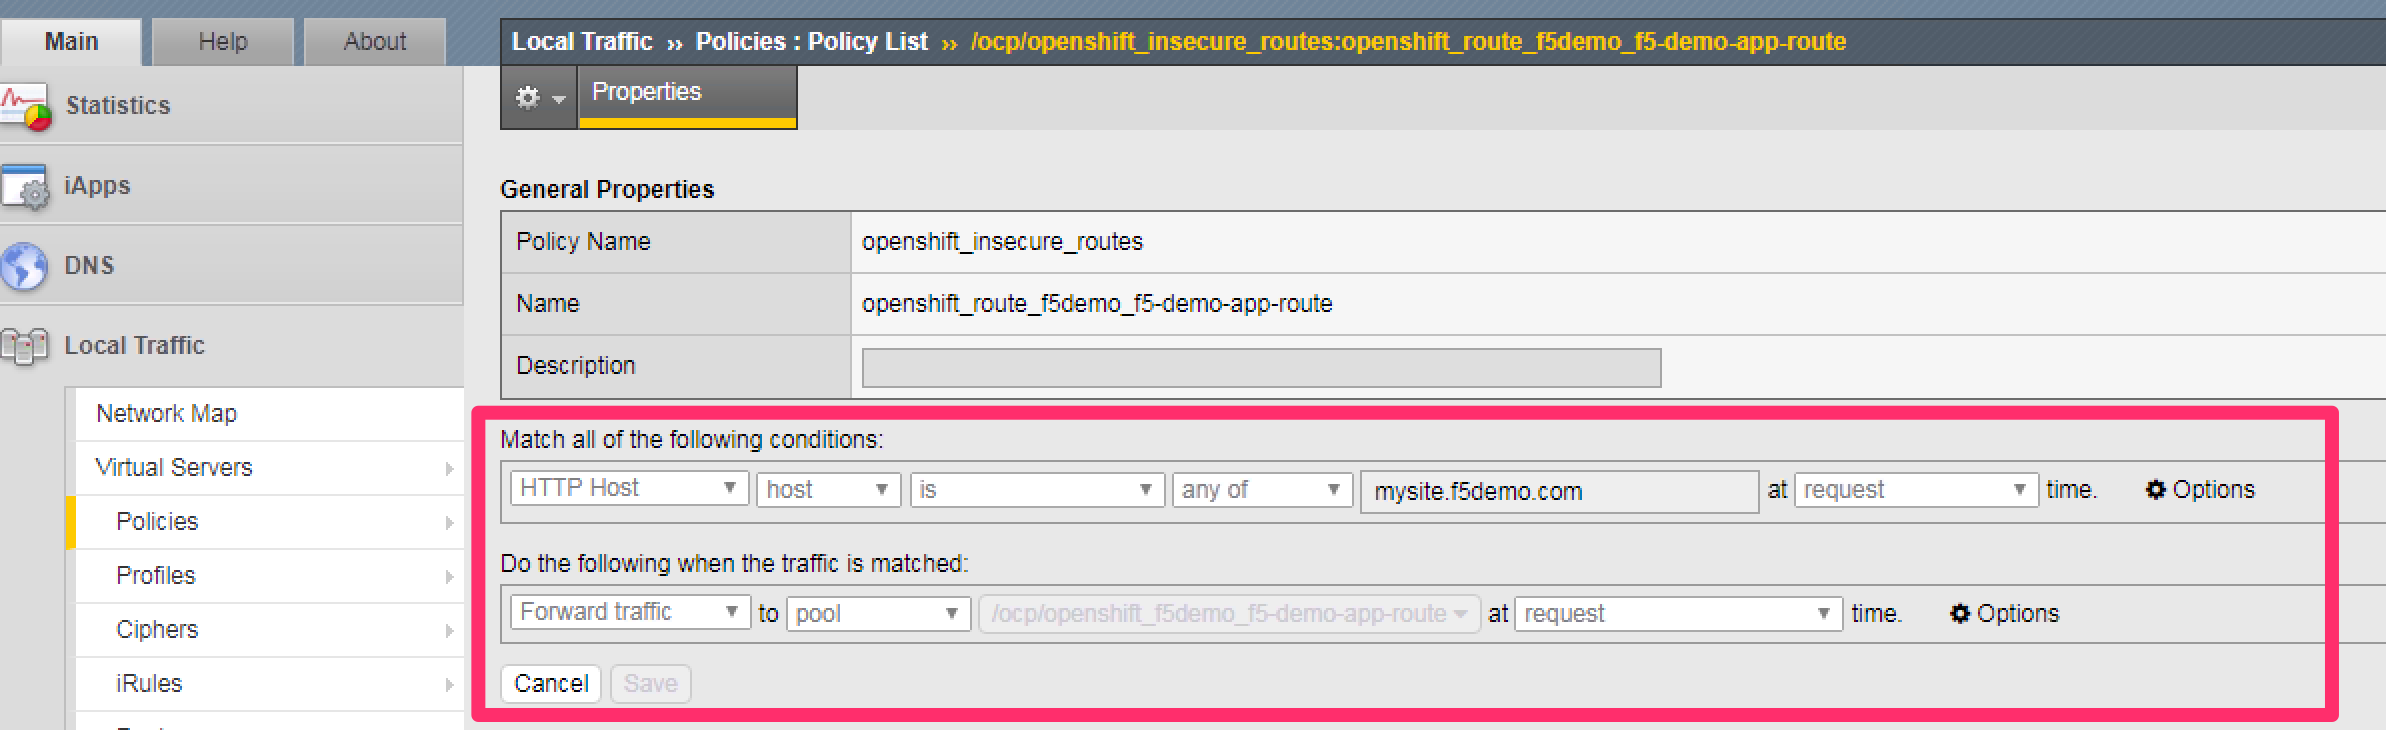
On the rule page, review the configuration of the rule and note the match condition and rule action settings.
Attention
Knowledge Check: Which OpenShift resource type defines the hostname to match against?
Step 5: Test the application
In this step, you will use the Chrome browser to access the application you previously deployed.
Because the Route resource you created specifies a hostname for the path, you will need to use a hostname instead of an IP address to access the demo application.
Open a new Chrome browser tab and enter the hostname mysite.f5demo.com in to the address bar:
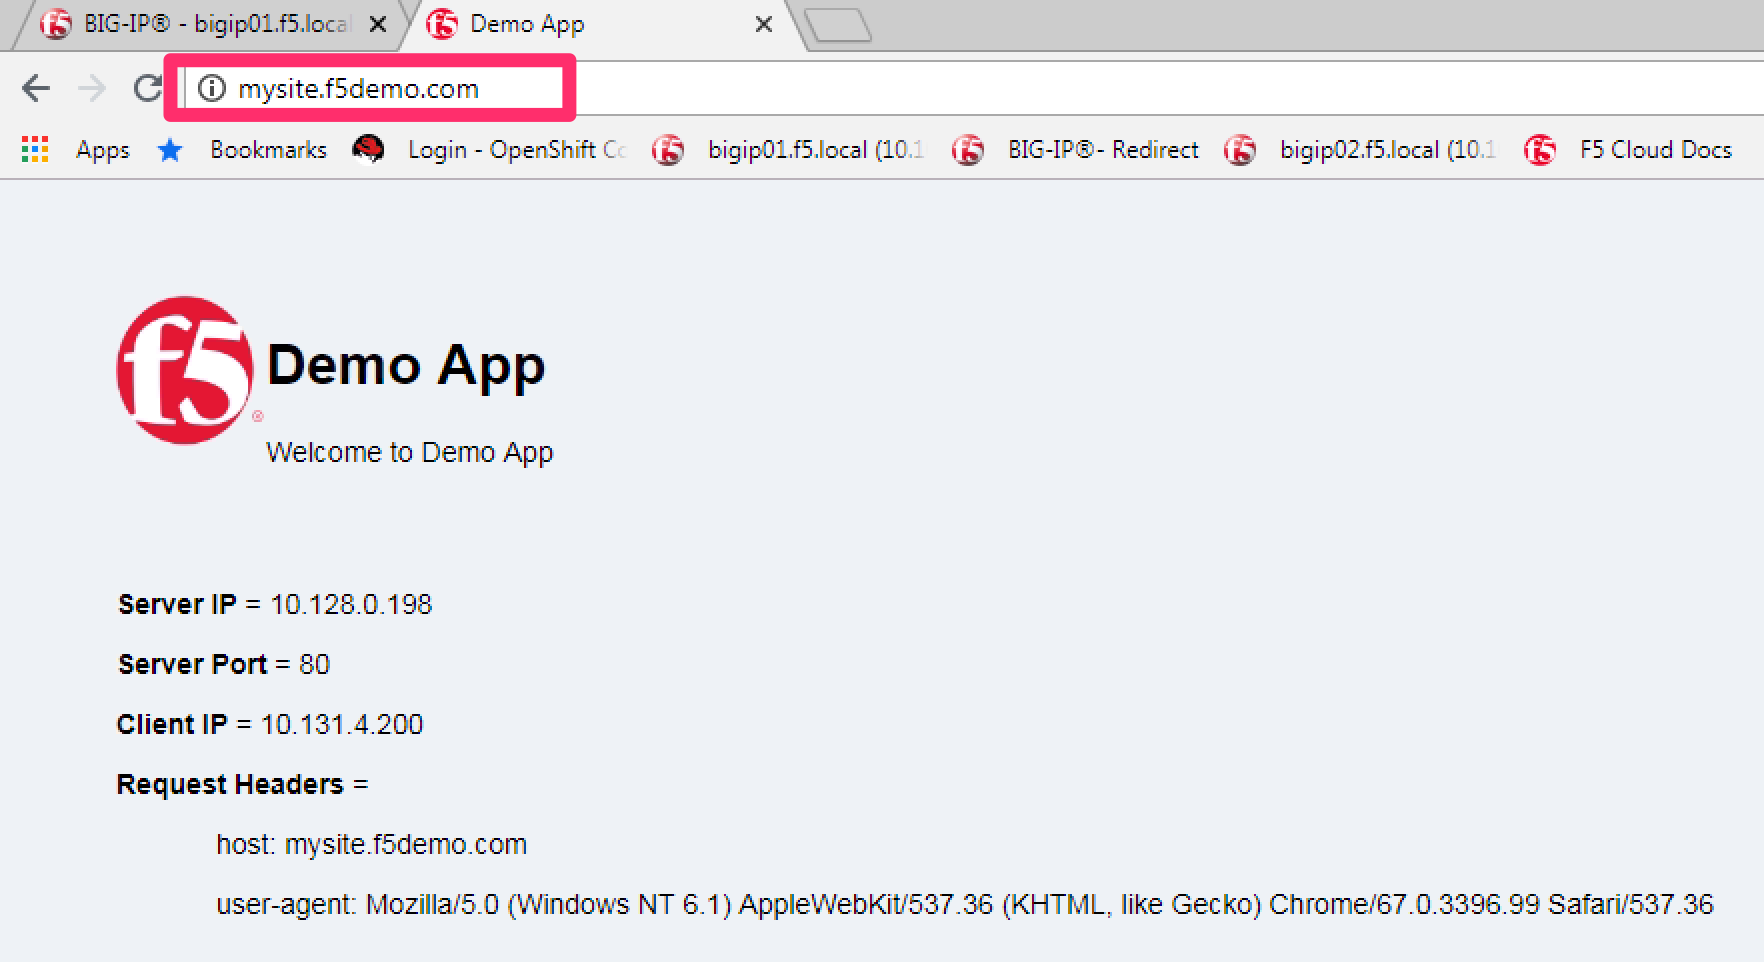
On the application page, the Server IP is the pool member (pod) IP address; the Server Port is the port of the virtual server; and the Client IP is the IP address of the Windows jumpbox you are using.
Step 6: Cleanup deployed resources
In this step, you will remove the Deployment, Service and Route resources you created in the previous steps using the OpenShift oc delete command.
From ose-master server, issue the following commands:
[root@ose-mstr01 tmp]# oc delete -f f5-demo-app-route-route.yaml -n f5demo
route "f5-demo-app-route" deleted

[root@ose-mstr01 tmp]# oc delete -f f5-demo-app-route-deployment.yaml -n f5demo
deployment "f5-demo-app-route" deleted
service "f5-demo-app-route" deleted
Exercise 3: Route - Blue/Green Testing
The F5 Container Connector supports Blue/Green application testing e.g testing two different versions of the same application, by using the weight parameter of OpenShift Routes. The weight parameter allows you to establish relative ratios between application Blue and application Green. So, for example, if the first route specifies a weight of 20 and the second a weight of 10, the application associated with the first route ill get twice the number of requests as the application associated with the second route.
Just as in the previous exercise, the F5 Container Connector reads the Route resource and creates a virtual server, node(s), a pool per route path and pool members.
However, in order to support Blue/Green testing using OpenShift Routes, the Container Connector creates an iRule and a datagroup on the BIG-IP. Troubleshooting handles the connection routing based on the assigned weights.
Note
At smaller request volumes, the ratio of requests to the Blue application and the requests to the Green application may not match the relative weights assigned in the OpenShift Route. However, as the number of requests increases, the ratio of requests between the Blue application and the Green application should closely match the weights assigned in the OpenShift Route.
To complete this exercise, you will perform the following steps:
- Step 1: Deploy version 1 and version 2 of demo application and their related Services
- Step 2: Create an OpenShift Route for Blue/Green testing
- Step 3: Review BIG-IP configuration
- Step 4: Test the application
- Step 5: Generate some request traffic
- Step 6: Review the BIG-IP configuration
- Step 7: Cleanup deployed resources
Step 1: Deploy version 1 and version 2 of demo application and their associated Services
From ose-master, review the following deployment: f5-demo-app-bg-deployment.yaml
1 2 3 4 5 6 7 8 9 10 11 12 13 14 15 16 17 18 19 20 21 22 23 24 25 26 27 28 29 30 31 32 33 34 35 36 37 38 39 40 41 42 43 44 45 46 47 48 49 50 51 52 53 54 55 56 57 58 59 60 61 62 63 64 65 66 67 68 69 70 71 72 73 74 75 76 77 78 79 80 81 82 83 84 85 86 87 88 89 90 91 92 93 94 95 96 97 98 99 100 101 102 103 104 105 106 | apiVersion: extensions/v1beta1
kind: Deployment
metadata:
name: node-blue
namespace: f5demo
spec:
replicas: 1
template:
metadata:
labels:
run: node-blue
spec:
containers:
- image: "chen23/f5-demo-app"
env:
- name: F5DEMO_APP
value: "website"
- name: F5DEMO_NODENAME
value: "Node Blue (No SSL)"
- name: F5DEMO_NODENAME_SSL
value: "Node Blue (SSL)"
- name: F5DEMO_COLOR
value: "0000FF"
- name: F5DEMO_COLOR_SSL
value: "0000FF"
imagePullPolicy: IfNotPresent
name: node-blue
ports:
- containerPort: 80
- containerPort: 443
protocol: TCP
---
apiVersion: v1
kind: Service
metadata:
name: node-blue
labels:
run: node-blue
namespace: f5demo
spec:
ports:
- port: 80
protocol: TCP
targetPort: 80
name: http
- port: 443
protocol: TCP
targetPort: 443
name: https
type: ClusterIP
selector:
run: node-blue
---
apiVersion: extensions/v1beta1
kind: Deployment
metadata:
name: node-green
namespace: f5demo
spec:
replicas: 1
template:
metadata:
labels:
run: node-green
spec:
containers:
- image: "chen23/f5-demo-app"
env:
- name: F5DEMO_APP
value: "website"
- name: F5DEMO_NODENAME
value: "Node Green (No SSL)"
- name: F5DEMO_COLOR
value: "99FF99"
- name: F5DEMO_NODENAME_SSL
value: "Node Green (SSL)"
- name: F5DEMO_COLOR_SSL
value: "00FF00"
imagePullPolicy: IfNotPresent
name: node-green
ports:
- containerPort: 80
- containerPort: 443
protocol: TCP
---
apiVersion: v1
kind: Service
metadata:
name: node-green
labels:
run: node-green
spec:
ports:
- port: 80
protocol: TCP
targetPort: 80
name: http
type: ClusterIP
selector:
run: node-green
|
Now that you have reviewed the Deployment, you need to actually create it by deploying it to OpenShift by using the oc create command:
[root@ose-mstr01 tmp]# oc create -f f5-demo-app-bg-deployment.yaml -n f5demo
deployment "node-blue" created
service "node-blue" created
deployment "node-green" created
service "node-green" created
Step 2: Create OpenShift Route for Blue/Green Testing
The basic Route example from the previous exercise only included one path. In order to support Blue/Green application testing, a Route must be created that has two paths. In OpenShift, the second (and subsequent) path is defined in the alternateBackends section of a Route resource.
From ose-master, review the following Route: f5-demo-app-bg-route.yaml
1 2 3 4 5 6 7 8 9 10 11 12 13 14 15 16 17 18 19 20 21 22 23 24 25 26 27 28 29 30 31 | apiVersion: v1
kind: Route
metadata:
labels:
name: f5-demo-app-bg-route
name: f5-demo-app-bg-route
namespace: f5demo
annotations:
# Specify a supported BIG-IP load balancing mode
virtual-server.f5.com/balance: least-connections-node
virtual-server.f5.com/health: |
[
{
"path": "mysite-bg.f5demo.com/",
"send": "HTTP GET /",
"interval": 5,
"timeout": 10
}
]
spec:
host: mysite-bg.f5demo.com
port:
targetPort: 80
to:
kind: Service
name: node-blue
weight: 20
alternateBackends:
- kind: Service
name: node-green
weight: 10
|
Note
How the Route resource refers to two different services: The first service is for the Blue application with a weight of 20 and the second service is for the Green application with a weight of 10.
Attention
Knowledge Check: How many requests will the **Blue* application receive relative to the Green application?*
Now that you have reviewed the Route, you need to actually create it by deploying it to OpenShift by using the oc create command:
[root@ose-mstr01 module3]# oc create -f f5-demo-app-bg-route.yaml
route "f5-demo-app-bg-route" created
Verify that the Route was successfully creating by using the OpenShift oc get route command. Note that, under the SERVICES column, the two applications are listed along with their request distribution percentages.
[root@ose-mstr01 tmp]# oc get route -n f5demo
NAME                   HOST/PORT              PATH      SERVICES                         PORT      TERMINATION   WILDCARD
f5-demo-app-bg-route   mysite-bg.f5demo.com   /         node-blue(66%),node-green(33%)   80                      None
Attention
Knowledge Check: What would the Route percentages be if the weights were 10 and 40?
Step 3: Review BIG-IP configuration
In this step, you will examine the BIG-IP configuration for changes made by the Container Connector after the the OpenShift Route was deployoed.
Using the Chrome web browser, navigate to Local Traffic –> Pools –> Pool List and change the partition to ocp using the dropdown in the upper right.

Note
There are two pools defined: one pool for the Blue application and a second pool for the Green application. Additionally, the Container Connector also creates an iRule and a datagroup that the BIG-IP uses to distribute traffic based on the weights assigned in the OpenShift Route.
Step 4: Test the application
In this step, you will use the Chrome browser to access blue and green applications you previously deployed.
Because the Route resource you created specifies a hostname for the path, you will need to use a hostname instead of an IP address to access the demo application.
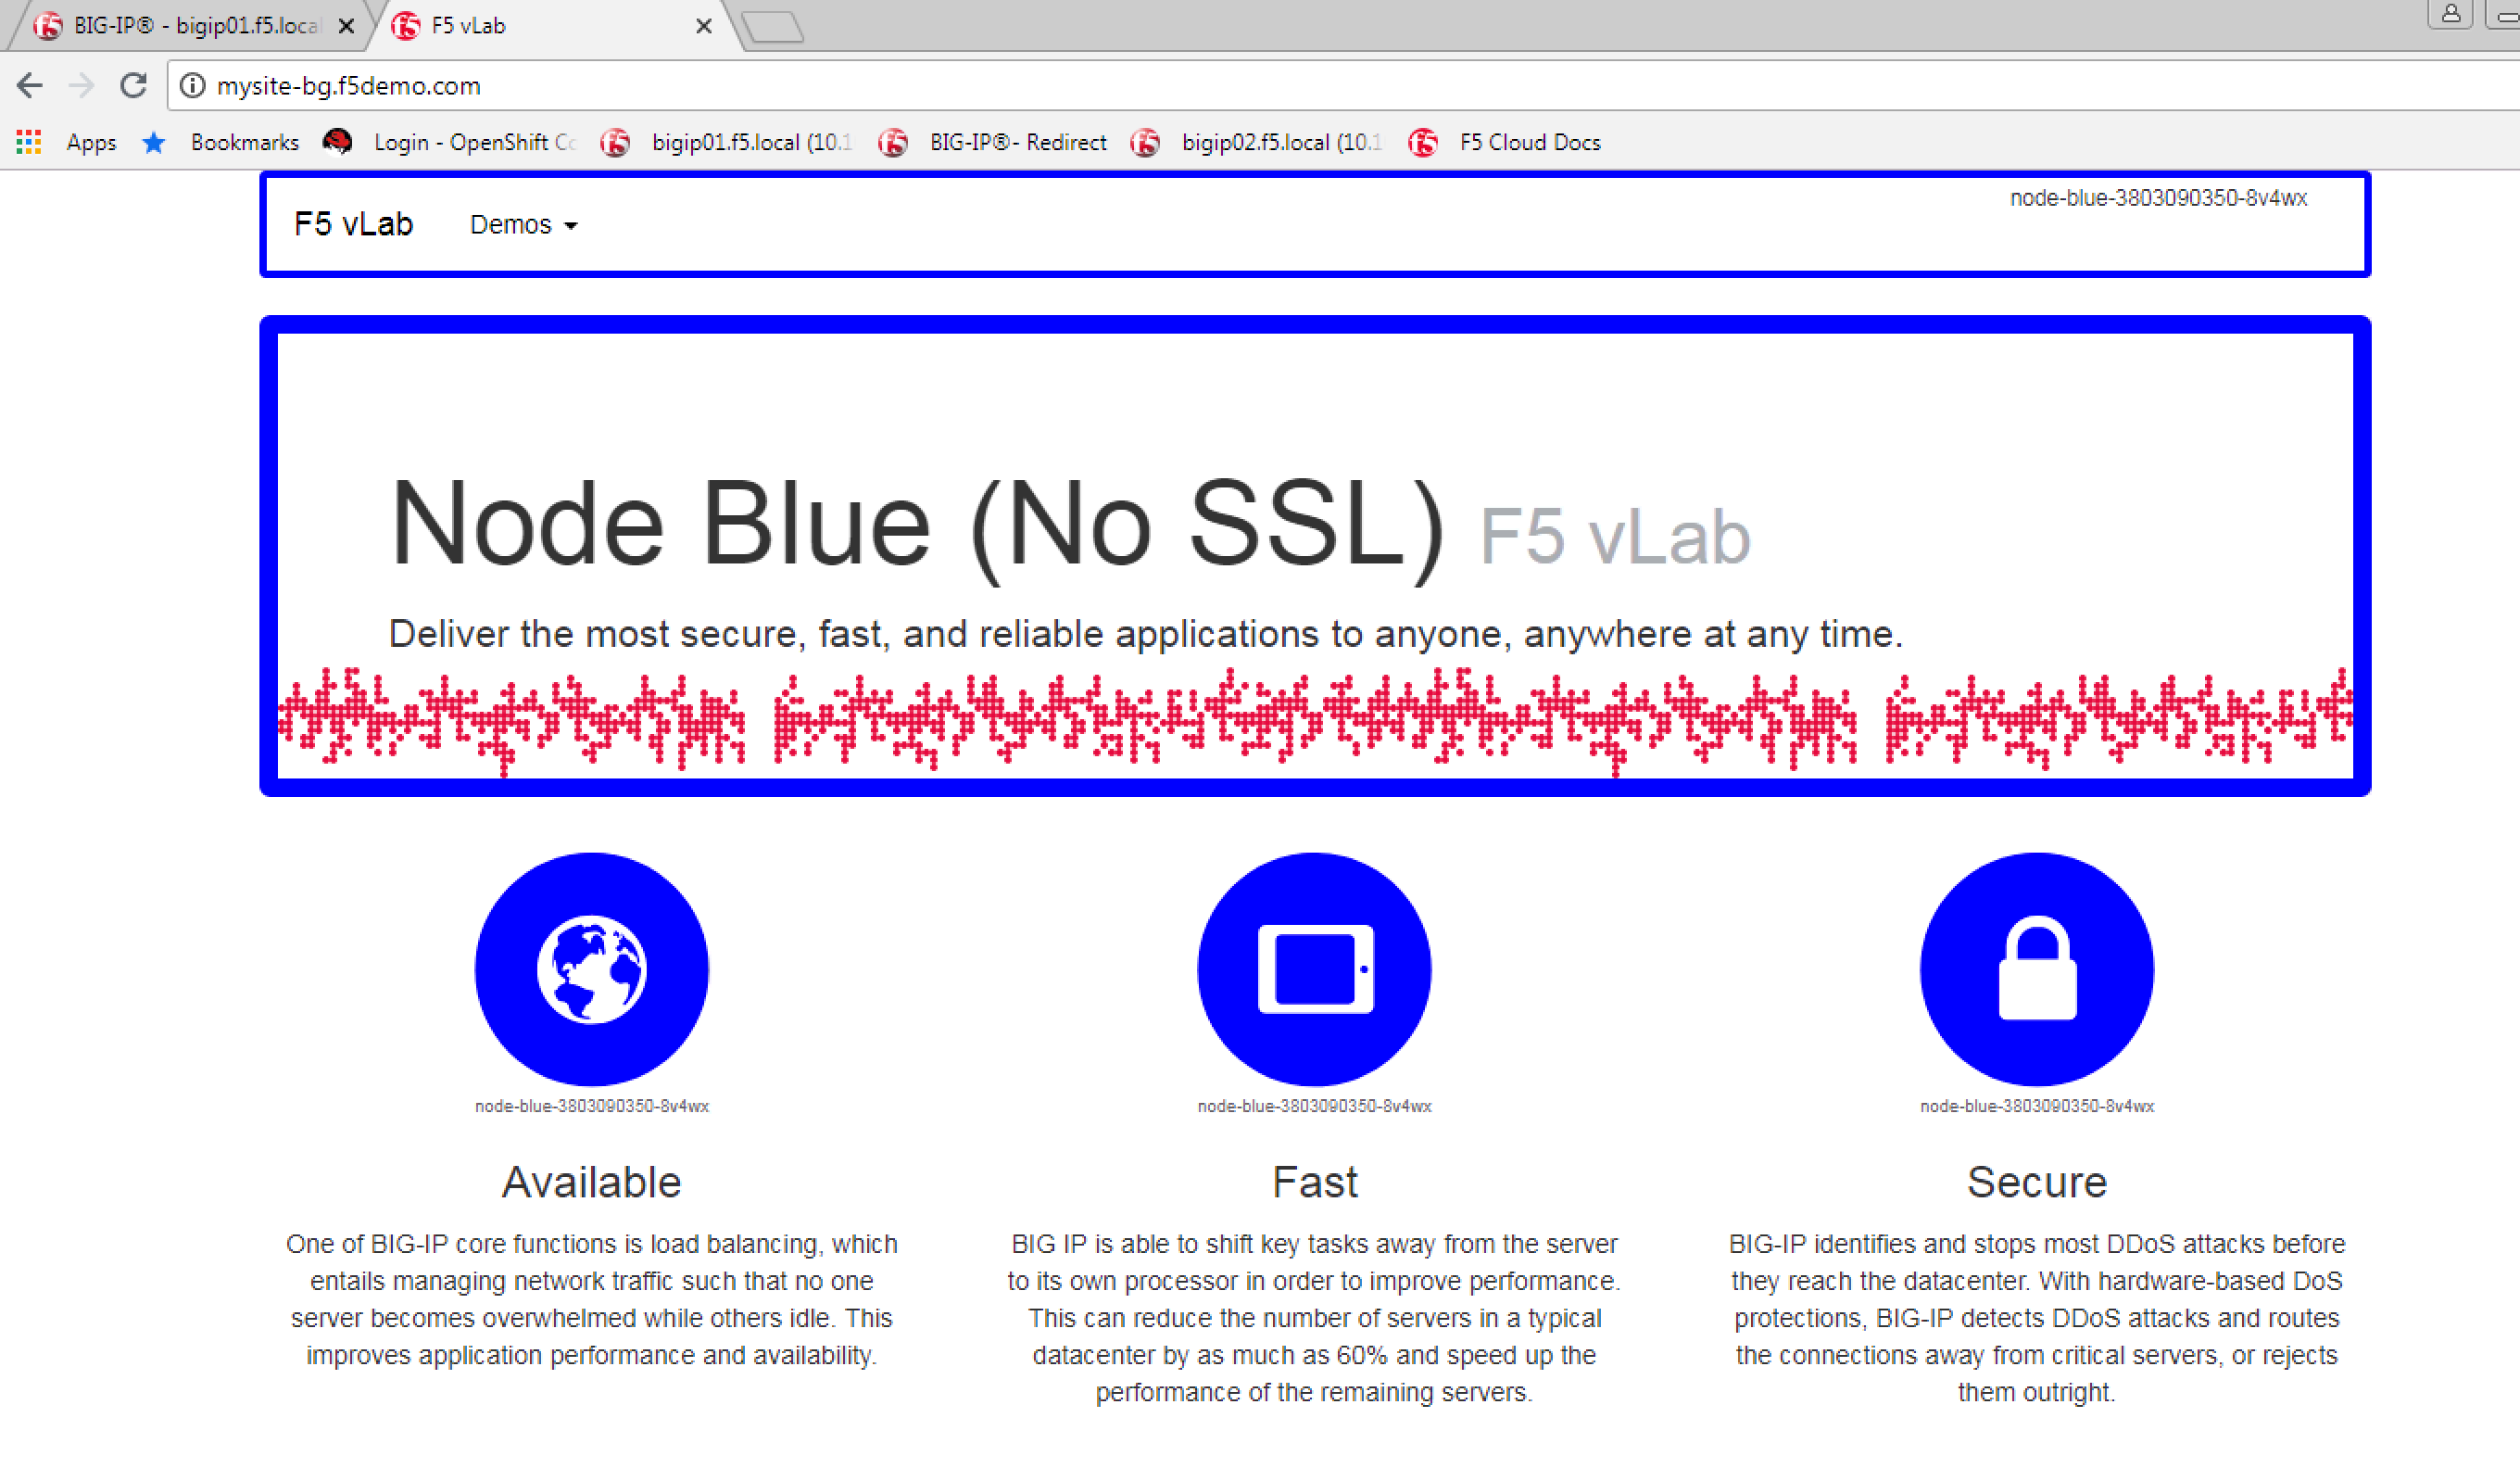
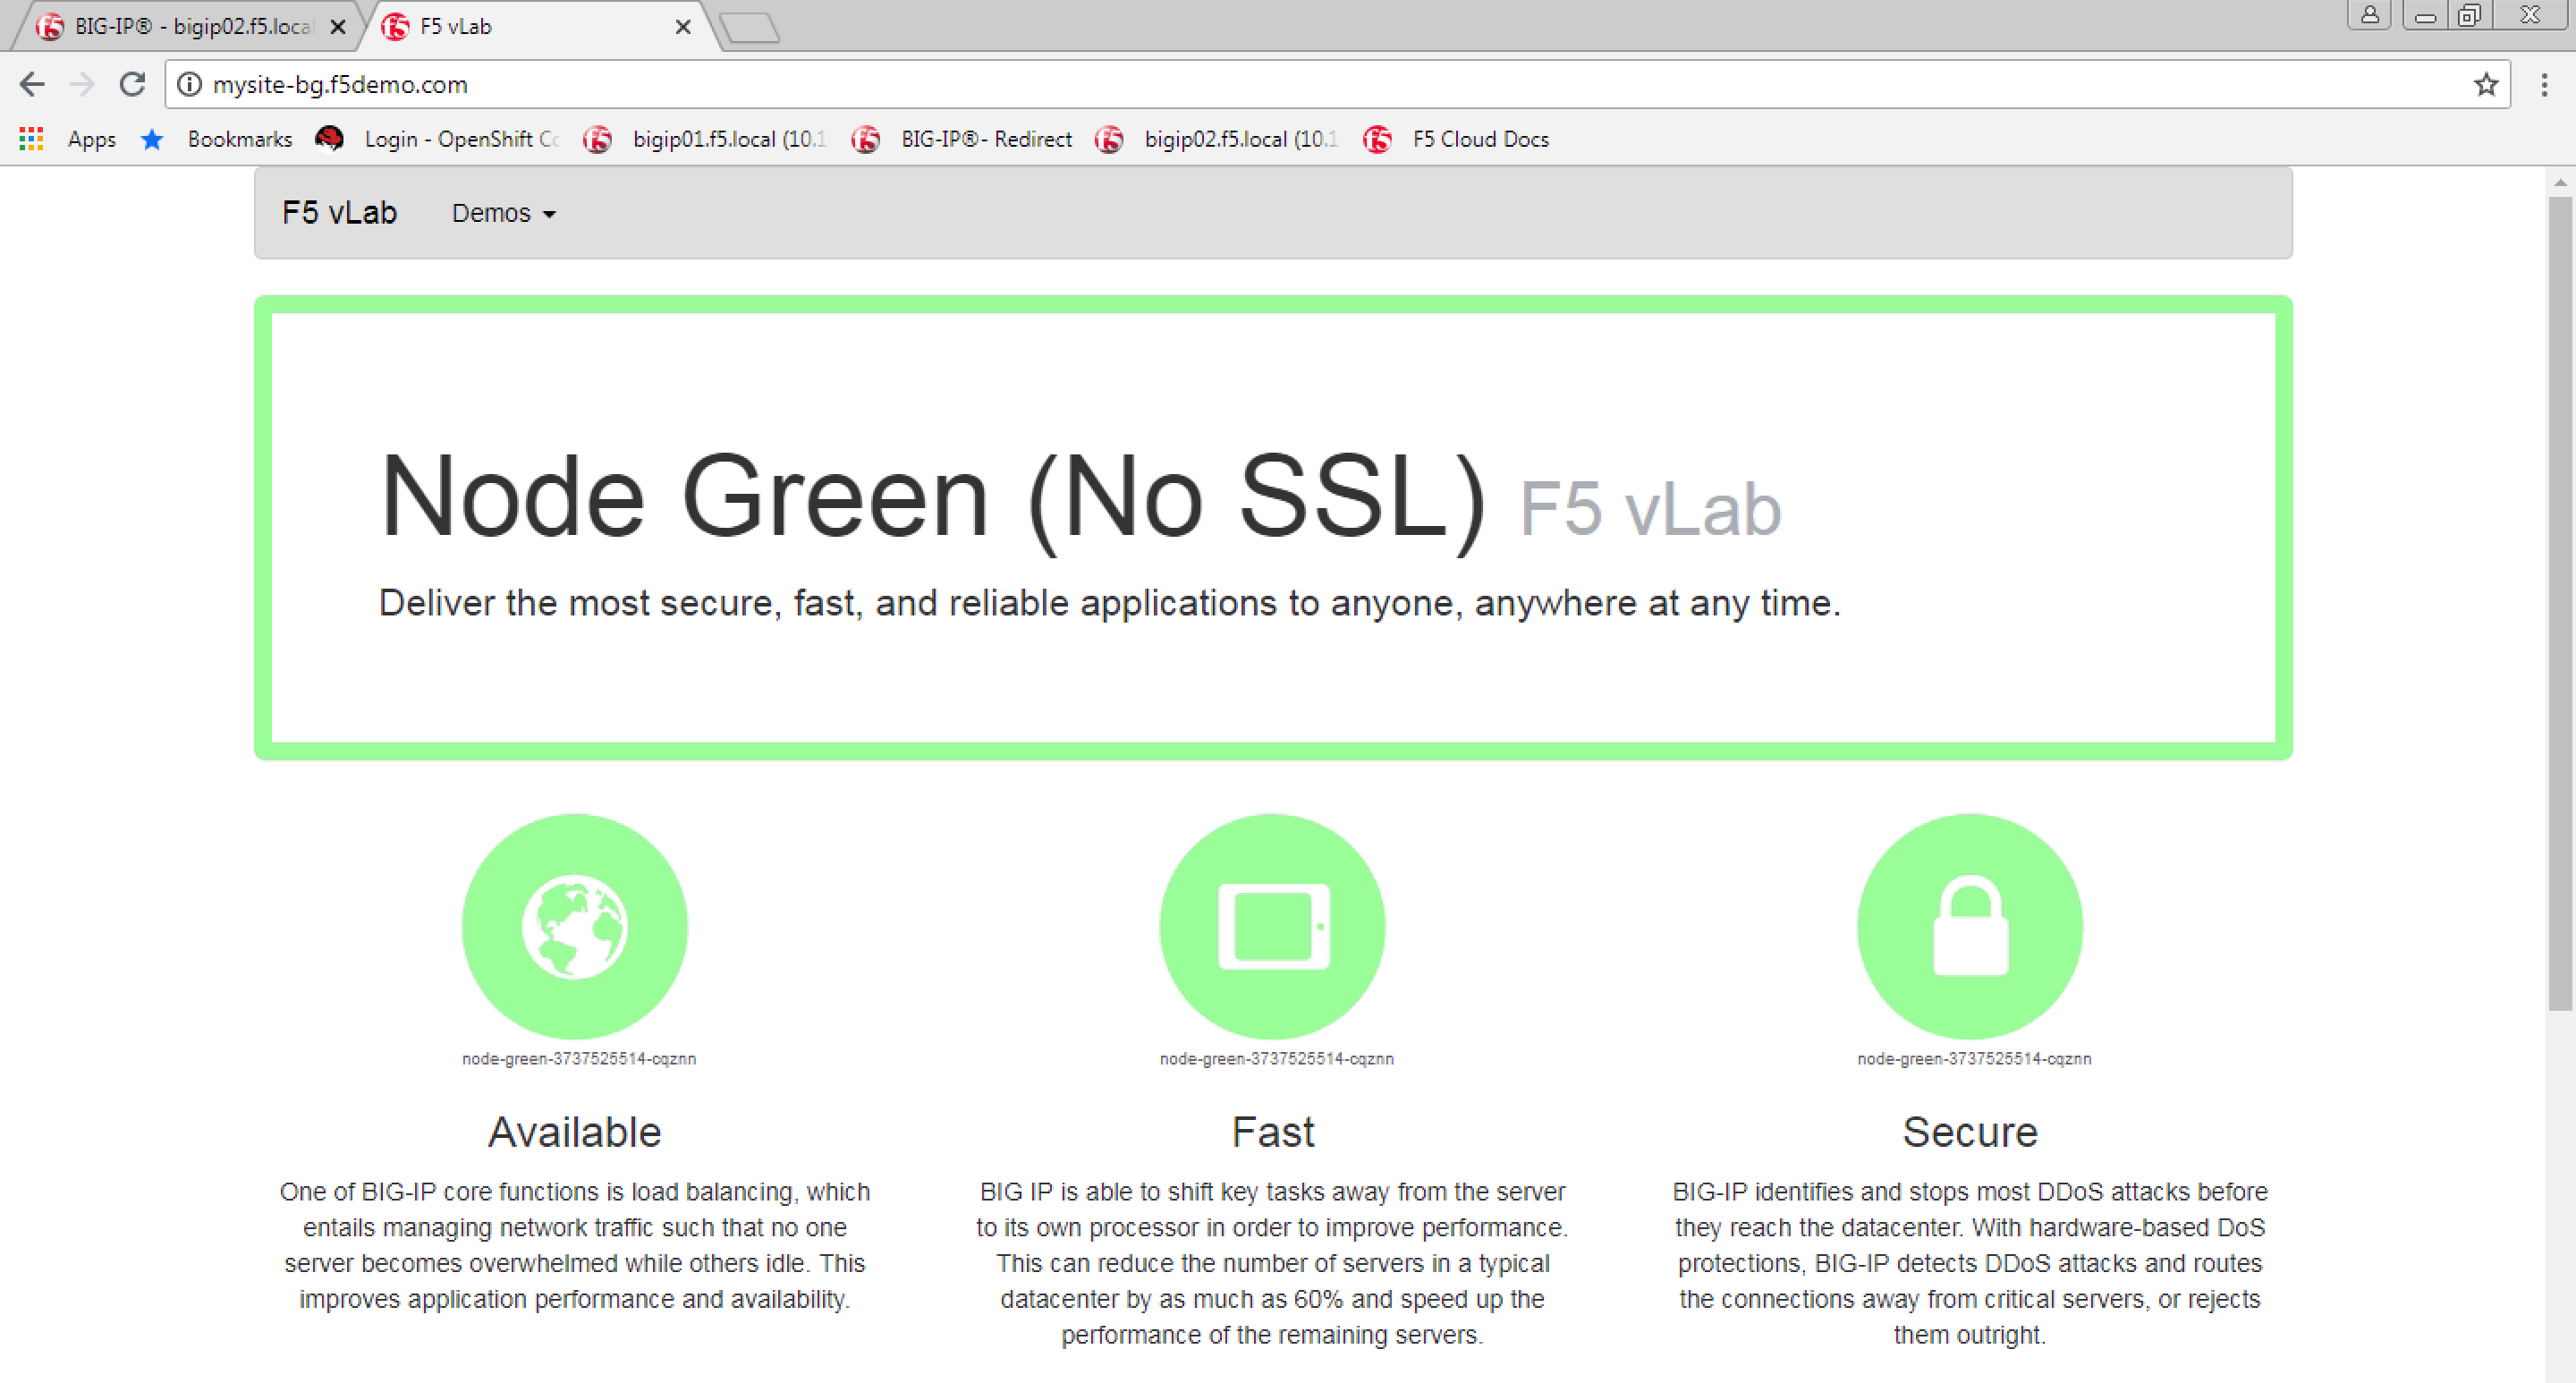
Open a new browser tab and enter the hostname mysite-bg.f5demo.com in to the address bar:

Refresh the browser periodically and you should see the web page change from the Blue application to the Green application and back to the Blue application as noted by the colors on the page.
Step 5: Generate some request traffic
As the number of requests increases, the relative number of requests between the Blue application and the Green application begins to approach the weights that have been defined in the OpenShift Route.
In this step, you will use the Linux curl utility to send a large volume of requests to the application.
From the ose-master server, run the following command to make 1000 requests to the application:
[root@ose-mstr01 ~]# for i in {1..1000}; do curl -s -o /dev/null http://mysite-bg.f5demo.com; done
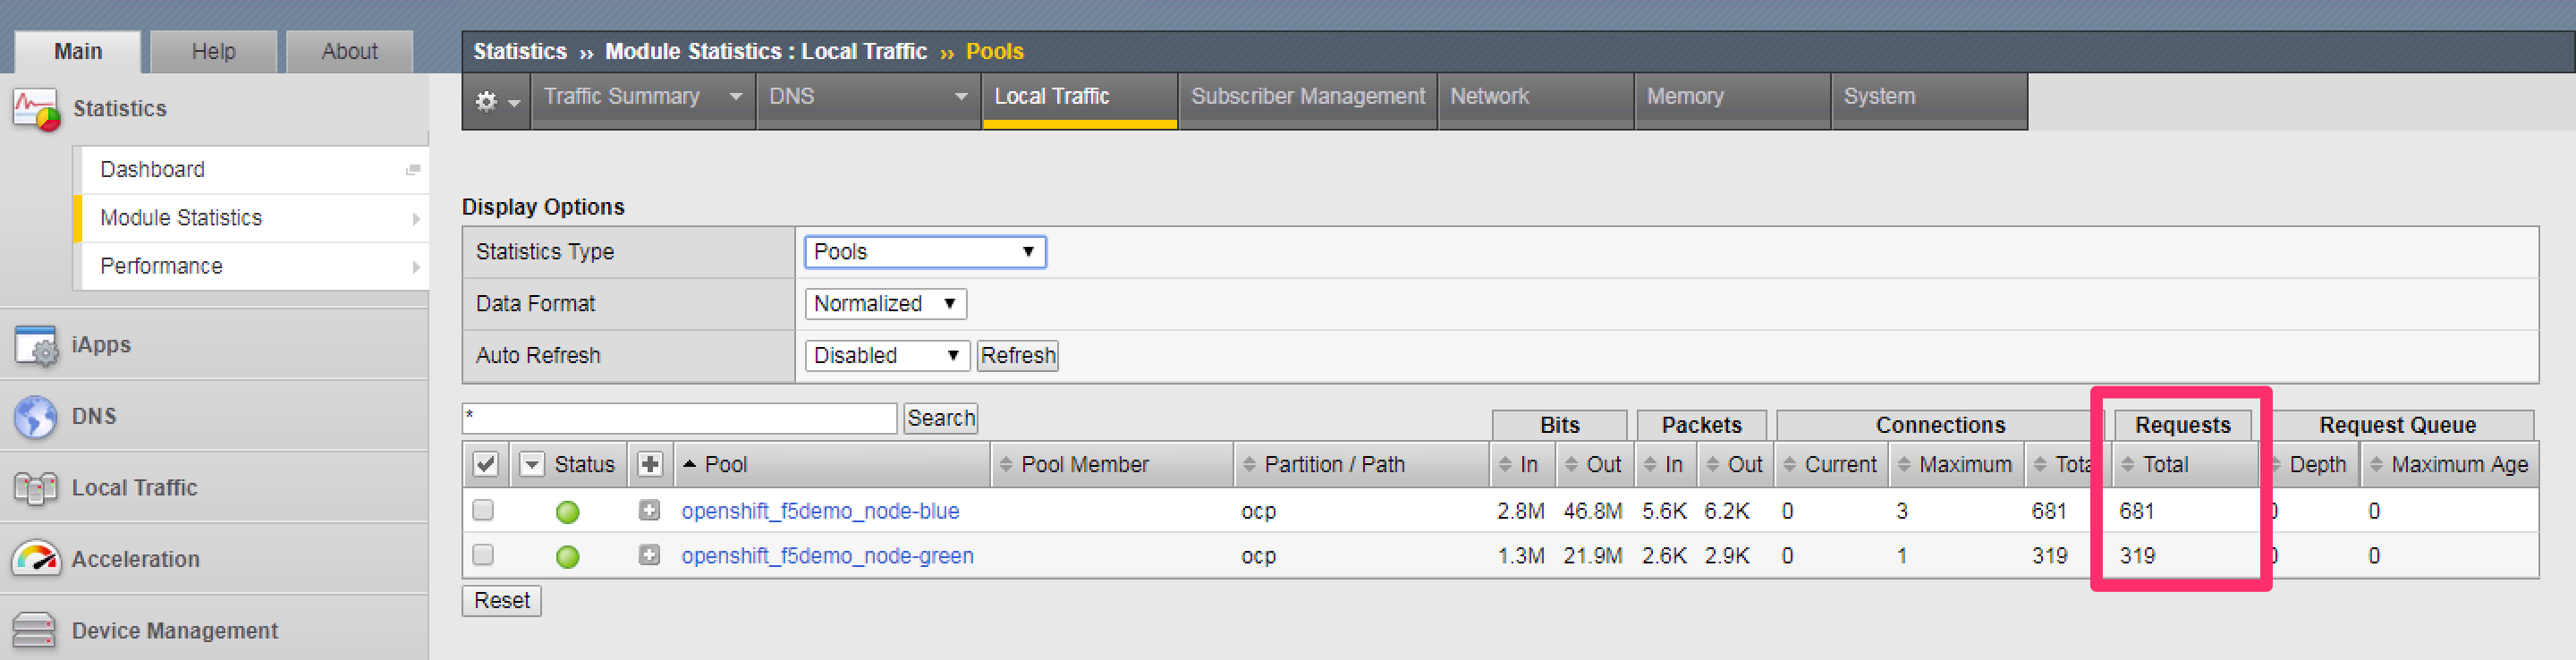
Step 6: Review the BIG-IP configuration
In the previous step, you used the curl utility to generate a large volume of requests. In this step, you will review the BIG-IP pool statistics to see how the requests were distributed between the Blue application and the Green application.
Using the Chrome web browser, navigate to Local Traffic -> Pools -> Statistics and change the partition to ocp using the dropdown in the upper right.
Step 7: Cleanup deployed resources
In this step, you will remove the Deployment, Service and Route resources you created in the previous steps using the OpenShift oc delete command.
From ose-master server, run the following commands:
[root@ose-mstr01 tmp]# oc delete -f f5-demo-app-bg-route.yaml -n f5demo
route "f5-demo-app-bg-route" deleted

[root@ose-mstr01 tmp]# oc delete -f f5-demo-app-bg-deployment.yaml -n f5demo
deployment "node-blue" deleted
service "node-blue" deleted
deployment "node-green" deleted
service "node-green" deleted