Lab 2.1 - F5 Container Connector Setup
The BIG-IP Controller for OpenShift installs as a Deployment object
See also
The official CC documentation is here: Install the BIG-IP Controller: Openshift
BIG-IP Setup
To use F5 Container connector, you’ll need a BIG-IP up and running first.
Through the Jumpbox, you should have a BIG-IP available at the following URL: https://10.1.1.245
Warning
Connect to your BIG-IP and check it is active and licensed. Its login and password are: admin/admin
If your BIG-IP has no license or its license expired, renew the license. You just need a LTM VE license for this lab. No specific add-ons are required (ask a lab instructor for eval licenses if your license has expired)
Be sure to be in the
Commonpartition before creating the following objects.
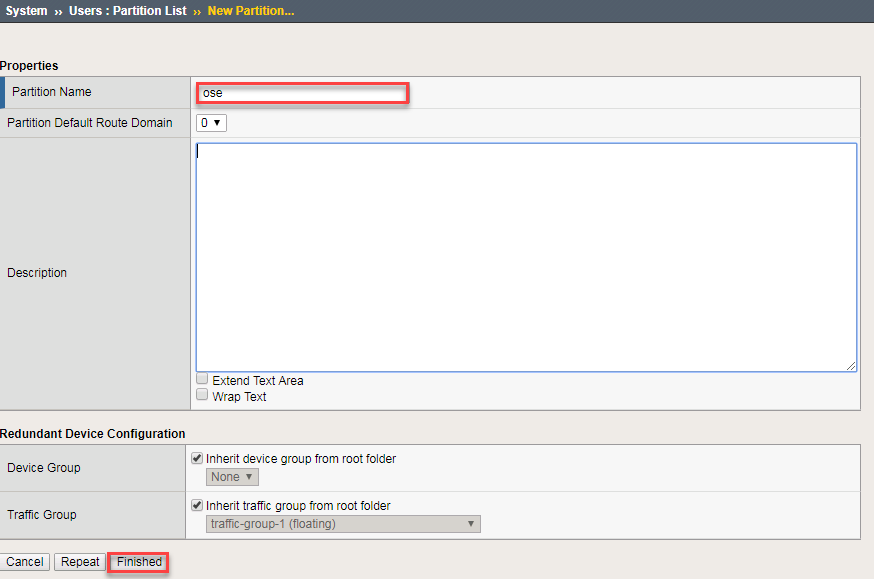
You need to setup a partition that will be used by F5 Container Connector.
# From the CLI:
tmsh create auth partition ose

# From the UI:
GoTo System --> Users --> Partition List
- Create a new partition called "ose" (use default settings)
- Click Finished
Create a vxlan tunnel profile
# From the CLI:
tmsh create net tunnel vxlan ose-vxlan {app-service none flooding-type multipoint}

# From the UI:
GoTo Network --> Tunnels --> Profiles --> VXLAN
- Create a new profile called "ose-vxlan"
- Set the Flooding Type = Multipoint
- Click Finished

Create a vxlan tunnel
# From the CLI:
tmsh create net tunnel tunnel ose-tunnel {key 0 local-address 10.3.10.60 profile ose-vxlan}

# From the UI:
GoTo Network --> Tunnels --> Tunnel List
- Create a new tunnel called "ose-tunnel"
- Set the Local Address to 10.3.10.60
- Set the Profile to the one previously created called "ose-vxlan"
- Click Finished

Container Connector Deployment
See also
For a more thorough explanation of all the settings and options see F5 Container Connector - Openshift
Now that BIG-IP is licensed and prepped with the “ose” partition, we need to define a Kubernetes deployment and create a Kubernetes secret to hide our bigip credentials.
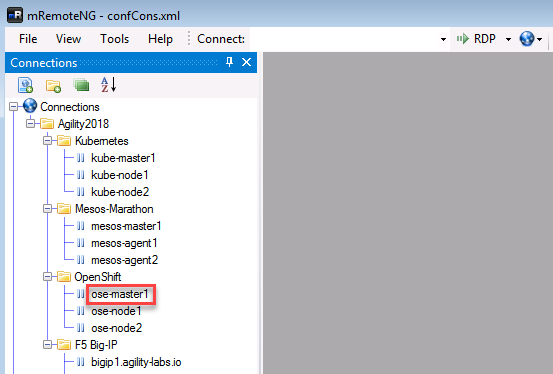
From the jumpbox open mRemoteNG and start a session with ose-master.
Note
As a reminder we’re utilizing a wrapper called MRemoteNG for Putty and other services. MRNG hold credentials and allows for multiple protocols(i.e. SSH, RDP, etc.), makes jumping in and out of SSH connections easier.
On your desktop select MRemoteNG, once launched you’ll see a few tabs similar to the example below. Open up the OpenShift Enterprise / OSE-Cluster folder and double click ose-master.
“git” the demo files
Note
These files should be here by default, if NOT run the following commands.
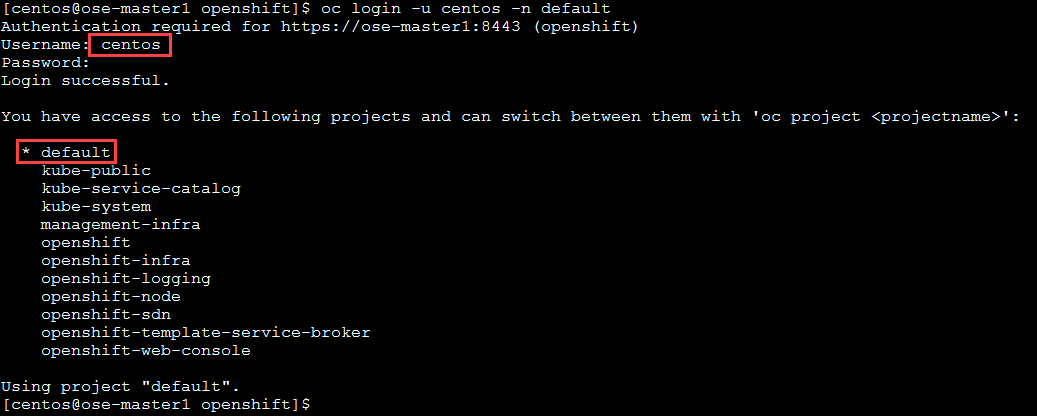
git clone https://github.com/f5devcentral/f5-agility-labs-containers.git ~/agilitydocs

cd ~/agilitydocs/openshift
Log in with an Openshift Client.
Note
Here we’re using a user “centos”, added when we built the cluster. When prompted for password, enter “centos”.
oc login -u centos -n default
Important
Upon logging in you’ll notice access to several projects. In our lab well be working from the default “default”.
Create bigip login secret
oc create secret generic bigip-login -n kube-system --from-literal=username=admin --from-literal=password=admin
You should see something similar to this:

Create kubernetes service account for bigip controller
oc create serviceaccount k8s-bigip-ctlr -n kube-system
You should see something similar to this:

Create cluster role for bigip service account (admin rights, but can be modified for your environment)
oc create clusterrolebinding k8s-bigip-ctlr-clusteradmin --clusterrole=cluster-admin --serviceaccount=kube-system:k8s-bigip-ctlr
You should see something similar to this:

Next let’s explore the f5-hostsubnet.yaml file
cd /root/agilitydocs/openshift

cat f5-bigip-hostsubnet.yaml
You’ll see a config file similar to this:
1
2
3
4
5
6
7
8
9
apiVersion: v1
kind: HostSubnet
metadata:
  name: openshift-f5-node
  annotations:
    pod.network.openshift.io/fixed-vnid-host: "0"
host: openshift-f5-node
hostIP: 10.3.10.60
subnet: "10.131.0.0/23"
Attention
This YAML file creates an OpenShift Node and the Host is the BIG-IP with an assigned /23 subnet of IP 10.131.0.0 (3 imagas down).
Next let’s look at the current cluster, you should see 3 members (1 master, 2 nodes)
oc get hostsubnet

Now create the connector to the BIG-IP device, then look before and after at the attached devices
oc create -f f5-bigip-hostsubnet.yaml
You should see a successful creation of a new OpenShift Node.

At this point nothing has been done to the BIG-IP, this only was done in the OpenShift environment.
oc get hostsubnet
You should now see OpenShift configured to communicate with the BIG-IP

Important
The Subnet assignment, in this case is 10.131.0.0/23, was assigned by the subnet: “10.131.0.0/23” line in “HostSubnet” yaml file.
Note
In this lab we’re manually assigning a subnet. We have the option to let openshift auto assign ths by removing subnet: “10.131.0.0/23” line at the end of the “hostsubnet” yaml file and setting the assign-subnet: “true”. It would look like this:
apiVersion: v1
kind: HostSubnet
metadata:
   name: openshift-f5-node
   annotations:
      pod.network.openshift.io/fixed-vnid-host: "0"
      pod.network.openshift.io/assign-subnet: "true"
host: openshift-f5-node
hostIP: 10.3.10.60
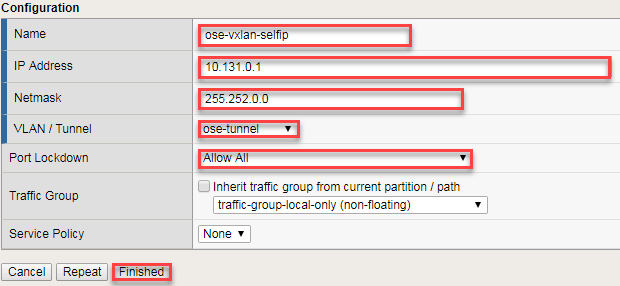
Create the vxlan tunnel self-ip
Tip
For your SELF-IP subnet, remember it is a /14 and not a /23 - Why? The Self-IP has to be able to understand those other /23 subnets are local in the namespace in the example above for Master, Node1, Node2, etc. Many students accidently use /23, but then the self-ip will be only to communicate to one subnet on the openshift-f5-node. When trying to ping across to services on other /23 subnets from the BIG-IP for instance, communication will fail as your self-ip doesn’t have the proper subnet mask to know those other subnets are local.
# From the CLI:
tmsh create net self ose-vxlan-selfip address 10.131.0.1/14 vlan ose-tunnel

# From the UI:
GoTo Network --> Self IP List
- Create a new Self-IP called "ose-vxlan-selfip"
- Set the IP Address to "10.131.0.1". (An IP from the subnet assigned in the previous step.)
- Set the Netmask to "255.252.0.0"
- Set the VLAN / Tunnel to "ose-tunnel" (Created earlier)
- Set Port Lockdown to "Allow All"
- Click Finished
Now we’ll create an Openshift F5 Container Connector to do the API calls to/from the F5 device. First we need the “deployment” file.
cd /root/agilitydocs/openshift

cat f5-cluster-deployment.yaml
You’ll see a config file similar to this:
 1
 2
 3
 4
 5
 6
 7
 8
 9
10
11
12
13
14
15
16
17
18
19
20
21
22
23
24
25
26
27
28
29
30
31
32
33
34
35
36
37
38
39
apiVersion: extensions/v1beta1
kind: Deployment
metadata:
  name: k8s-bigip-ctlr
  namespace: kube-system
spec:
  replicas: 1
  template:
    metadata:
      name: k8s-bigip-ctlr
      labels:
        app: k8s-bigip-ctlr
    spec:
      serviceAccountName: k8s-bigip-ctlr
      containers:
        - name: k8s-bigip-ctlr
          image: "f5networks/k8s-bigip-ctlr:latest"
          imagePullPolicy: IfNotPresent
          env:
            - name: BIGIP_USERNAME
              valueFrom:
                secretKeyRef:
                  name: bigip-login
                  key: username
            - name: BIGIP_PASSWORD
              valueFrom:
                secretKeyRef:
                  name: bigip-login
                  key: password
          command: ["/app/bin/k8s-bigip-ctlr"]
          args: [
            "--bigip-username=$(BIGIP_USERNAME)",
            "--bigip-password=$(BIGIP_PASSWORD)",
            "--bigip-url=10.3.10.60",
            "--bigip-partition=ose",
            "--namespace=default",
            "--pool-member-type=cluster",
            "--openshift-sdn-name=/Common/ose-tunnel"
          ]
Create the container connector deployment with the following command
oc create -f f5-cluster-deployment.yaml
Check for successful creation:
oc get pods -n kube-system -o wide

If the tunnel is up and running big-ip should be able to ping the cluster nodes. SSH to big-ip and run one or all of the following ping tests.
Hint
To SSH to big-ip use mRemoteNG and the bigip1 shortcut

# ping ose-master
ping 10.128.0.1

# ping ose-node1
ping 10.129.0.1

# ping ose-node2
ping 10.130.0.1