Lab 3.2 - F5 Container Connector Usage
Now that our container connector is up and running, let’s deploy an application and leverage our F5 CC.
For this lab we’ll use a simple pre-configured docker image called “f5-hello-world”. It can be found on docker hub at f5devcentral/f5-hello-world
To deploy our application, we will need to do the following:
- Define a Deployment: this will launch our application running in a container.
- Define a ConfigMap: this can be used to store fine-grained information like individual properties or coarse-grained information like entire config files or JSON blobs. It will contain the BIG-IP configuration we need to push.
- Define a Service: this is an abstraction which defines a logical set of pods and a policy by which to access them. Expose the service on a port on each node of the cluster (the same port on each node). You’ll be able to contact the service on any <NodeIP>:NodePort address. If you set the type field to “NodePort”, the Kubernetes master will allocate a port from a flag-configured range (default: 30000-32767), and each Node will proxy that port (the same port number on every Node) into your Service.
App Deployment
On kube-master1 we will create all the required files:
Create a file called
f5-hello-world-deployment.yamlTip
Use the file in /home/ubuntu/agilitydocs/kubernetes
 1
 2
 3
 4
 5
 6
 7
 8
 9
10
11
12
13
14
15
16
17
18
apiVersion: extensions/v1beta1
kind: Deployment
metadata:
  name: f5-hello-world
spec:
  replicas: 2
  template:
    metadata:
      labels:
        run: f5-hello-world
    spec:
      containers:
      - name: f5-hello-world
        image: "f5devcentral/f5-hello-world:latest"
        imagePullPolicy: IfNotPresent
        ports:
        - containerPort: 8080
          protocol: TCP
Create a file called
f5-hello-world-configmap.yamlTip
Use the file in /home/ubuntu/agilitydocs/kubernetes
Attention
The schema version below (for example 1.7) comes from the releases of big-ip-controller. For more information, head over to the following link for a quick review: https://clouddocs.f5.com/containers/v2/releases_and_versioning.html#schema-table
 1
 2
 3
 4
 5
 6
 7
 8
 9
10
11
12
13
14
15
16
17
18
19
20
21
22
23
24
25
26
27
28
29
30
31
32
33
apiVersion: v1
kind: ConfigMap
metadata:
  name: f5-hello-world
  namespace: default
  labels:
    f5type: virtual-server
data:
  schema: "f5schemadb://bigip-virtual-server_v0.1.7.json"
  data: |
    {
      "virtualServer": {
        "frontend": {
          "balance": "round-robin",
          "mode": "http",
          "partition": "kubernetes",
          "virtualAddress": {
            "bindAddr": "10.1.10.81",
            "port": 80
          }
        },
        "backend": {
          "serviceName": "f5-hello-world",
          "servicePort": 8080,
          "healthMonitors": [{
            "interval": 5,
            "protocol": "http",
            "send": "HEAD / HTTP/1.0\r\n\r\n",
            "timeout": 16
          }]
        }
      }
    }
Create a file called
f5-hello-world-service.yamlTip
Use the file in /home/ubuntu/agilitydocs/kubernetes
 1
 2
 3
 4
 5
 6
 7
 8
 9
10
11
12
13
14
apiVersion: v1
kind: Service
metadata:
  name: f5-hello-world
  labels:
    run: f5-hello-world
spec:
  ports:
  - port: 8080
    protocol: TCP
    targetPort: 8080
  type: NodePort
  selector:
    run: f5-hello-world
We can now launch our application:
kubectl create -f f5-hello-world-deployment.yaml
kubectl create -f f5-hello-world-configmap.yaml
kubectl create -f f5-hello-world-service.yaml

To check the status of our deployment, you can run the following commands:
kubectl get pods -o wide

# This can take a few seconds to a minute to create these hello-world containers to running state.
kubectl describe svc f5-hello-world

To test the app you need to pay attention to:
The NodePort value, that’s the port used by Kubernetes to give you access to the app from the outside. Here it’s “30507”, highlighted above.
The Endpoints, that’s our 2 instances (defined as replicas in our deployment file) and the port assigned to the service: port 8080.
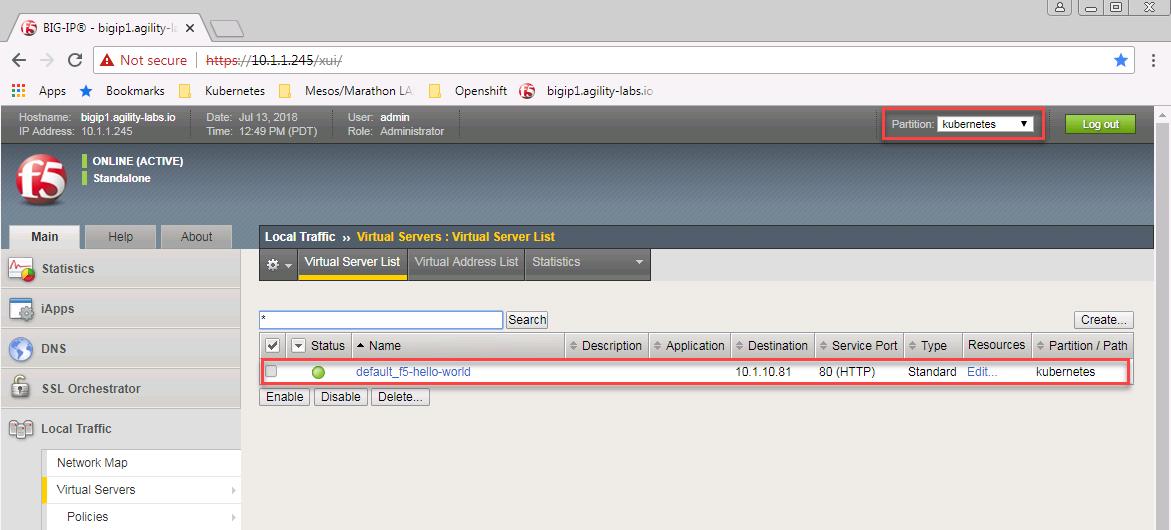
Now that we have deployed our application sucessfully, we can check our BIG-IP configuration. From the browser open https://10.1.1.245
Warning
Don’t forget to select the “kubernetes” partition or you’ll see nothing.
Here you can see a new Virtual Server, “default_f5-hello-world” was created, listening on 10.1.10.81.
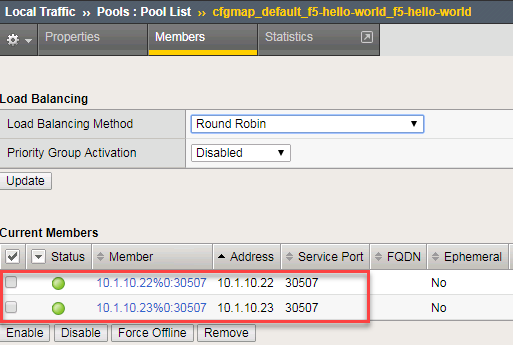
Check the Pools to see a new pool and the associated pool members: Local Traffic –> Pools –> “cfgmap_default_f5-hello-world_f5-hello-world” –> Members

Note
You can see that the pool members listed are all the kubernetes nodes. (NodePort mode)
Now you can try to access your application via your BIG-IP VIP: 10.1.10.81
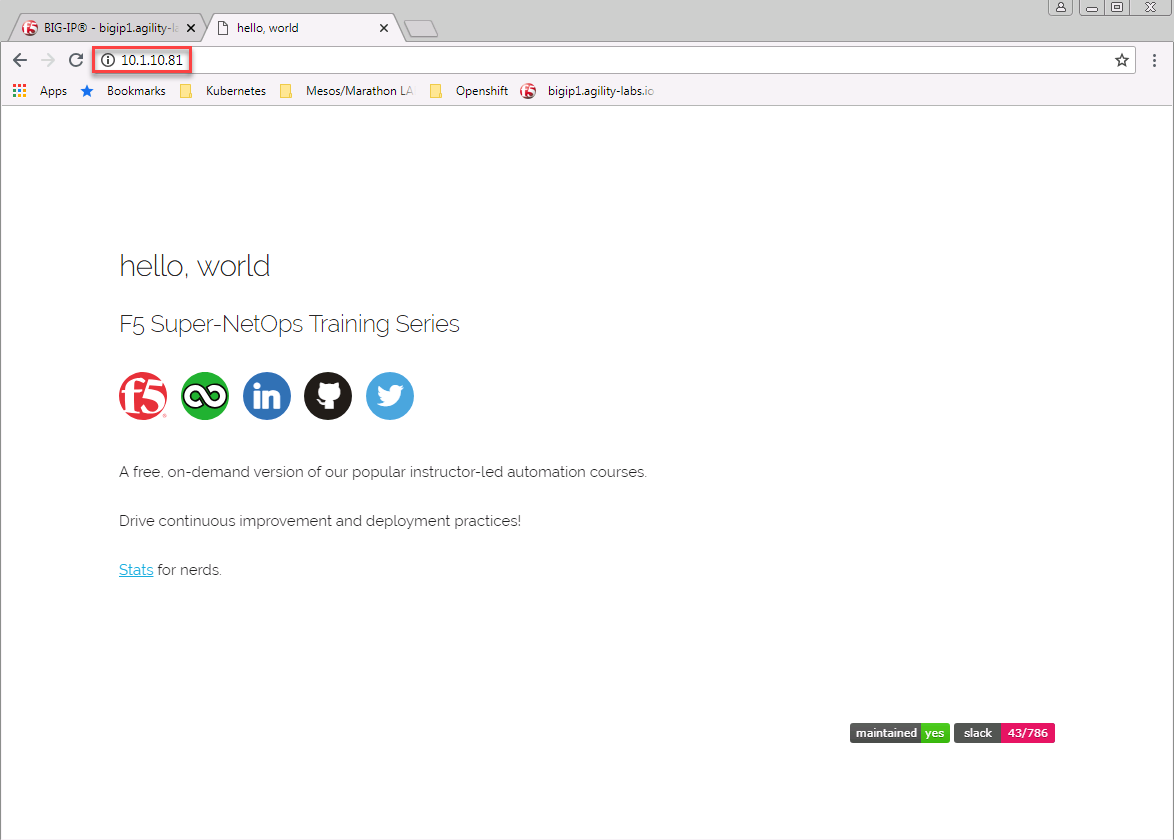
Hit Refresh many times and go back to your BIG-IP UI, go to Local Traffic –> Pools –> Pool list –> cfgmap_default_f5-hello-world_f5-hello-world –> Statistics to see that traffic is distributed as expected.

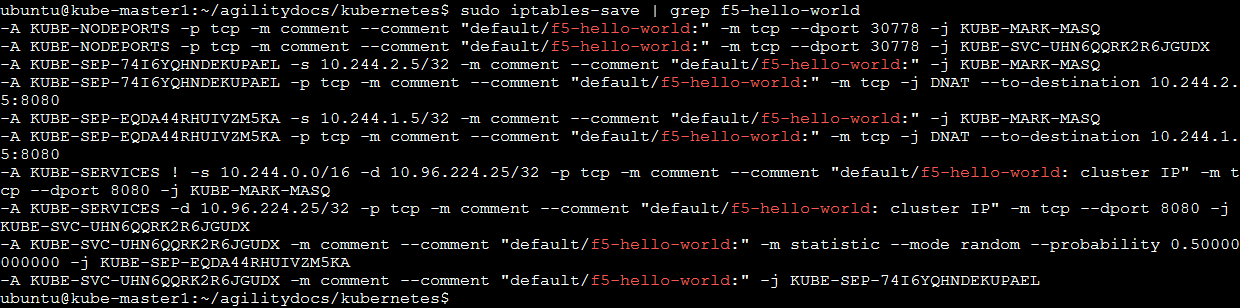
How is traffic forwarded in Kubernetes from the <node IP>:30507 to the <container IP>:8080? This is done via iptables that is managed via the kube-proxy instances. On either of the nodes, SSH in and run the following command:
sudo iptables-save | grep f5-hello-worldThis will list the different iptables rules that were created regarding our service.
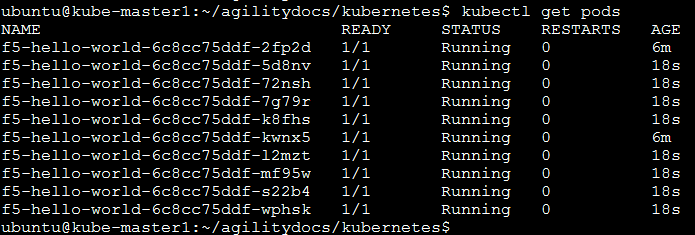
Scale the f5-hello-world app
kubectl scale --replicas=10 deployment/f5-hello-world -n default
Check that the pods were created
kubectl get pods
Check the pool was updated on big-ip
Attention
Why are there only 2 pool members?